Book a demo
Facebook & Instagram Comment Automation

Kaili Wardlaw
Apr 03, 2024
7 Min Read
TABLE OF CONTENTS
- What is this feature?
- Pre Requisite
- How to integrate Facebook and Instagram account?
- What are the new Triggers?
- When the contact will be saved?
- What are the new Actions?
- Here is how the workflow will look
- Here is how the message will look in Facebook and Instagram
- Important points to be noted
What is this feature?
- This is an amazing feature to drive more sales and conversations with the customers on Facebook and Instagram.
- Attract and engage with customers when they’re ready.
- Never let a lead slip away and never miss a follow-up opportunity. Identify interested leads and reengage them without running expensive retargeting ad campaigns.
- Instantly engage with each comment so you attract customers faster than ever before and never miss an opportunity with a potential lead.
Prerequisite
- To use this feature Facebook account should be integrated.
- To use the actions in the workflows, the Facebook User comments on a post or Instagram User comments on a post trigger should be available.
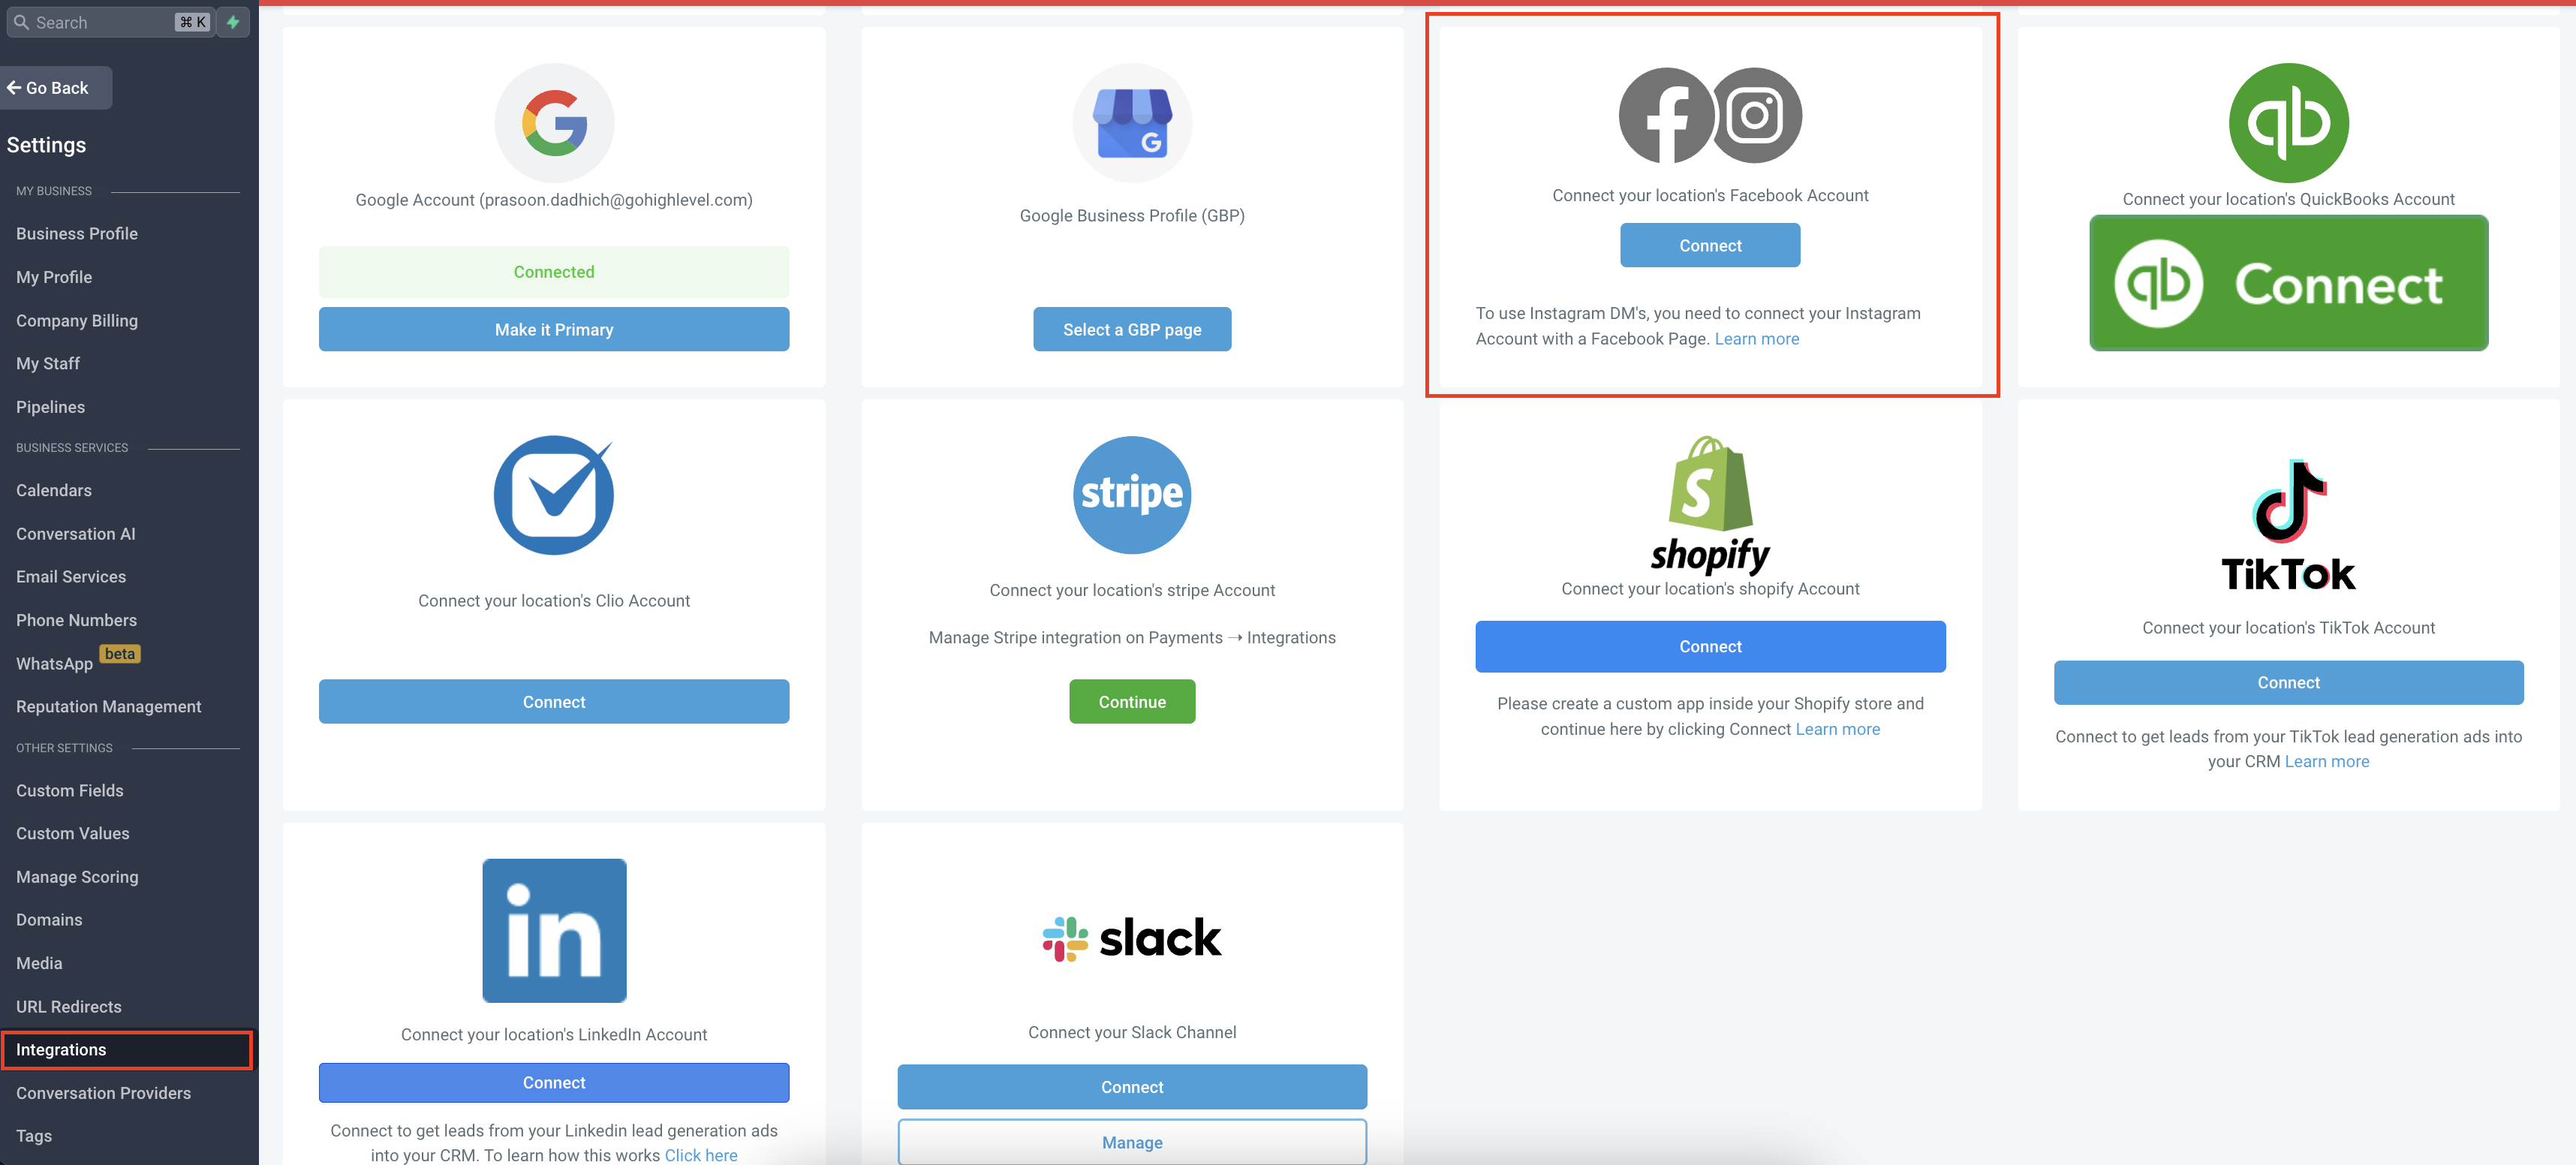
How to integrate Facebook and Instagram account?
Follow the below mentioned steps to integrate your account
- Go to settings
- Go to integrations
- Hover over to Facebook and Instagram section
- Connect your account
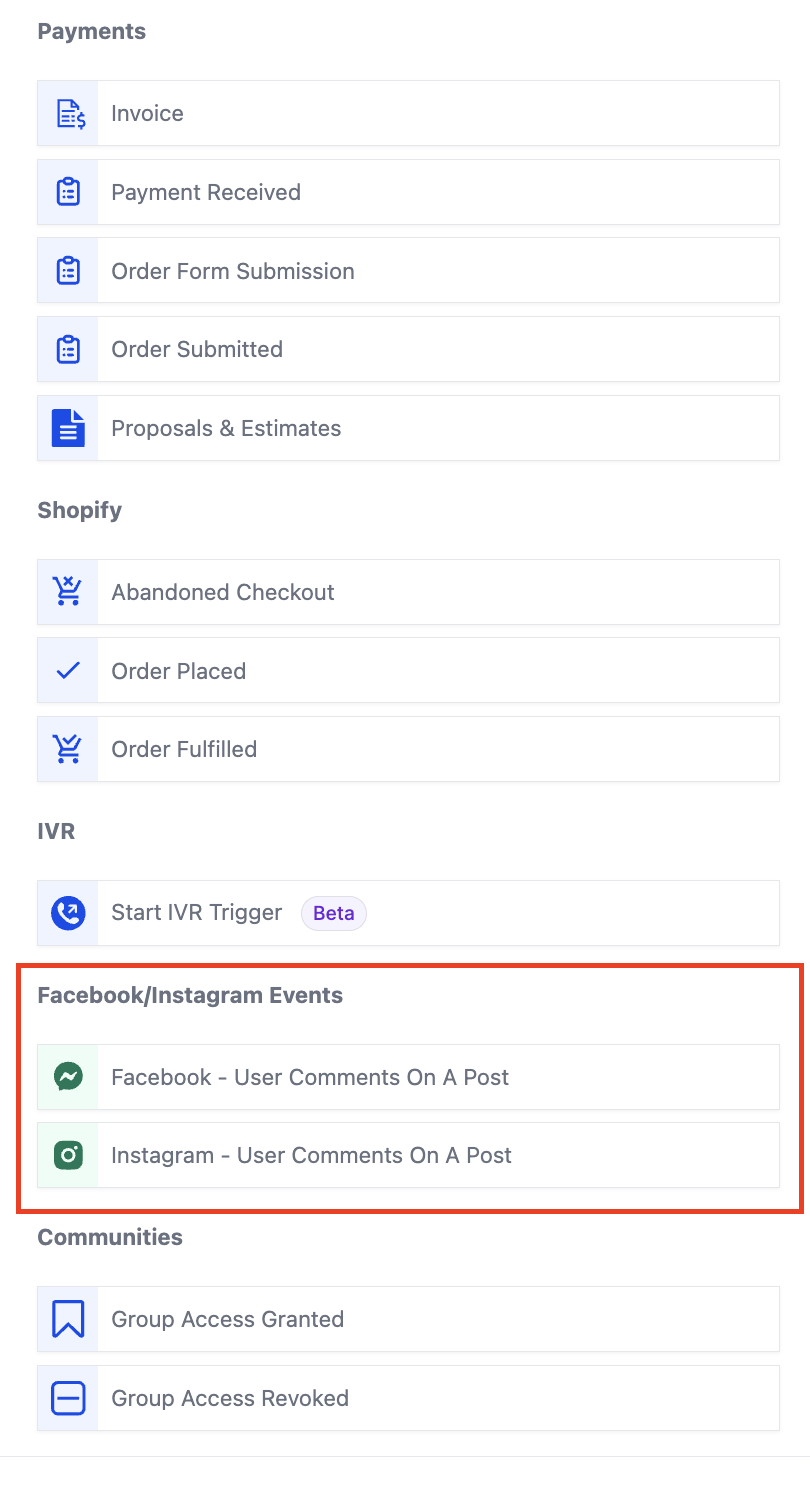
What are the new Triggers?
When creating a workflow click on “Add Trigger”. The triggers related to comment automation are present in the “Facebook/Instagram events” category. You can directly search for the trigger or scroll down to the category.
- Facebook – User comments on a post
- Instagram – User comments on a post
- Go to triggers and select from the available triggers based on your use case.
- After clicking on the trigger the sidebar will open. There are multiple filters present here. The first step is to select the Page.
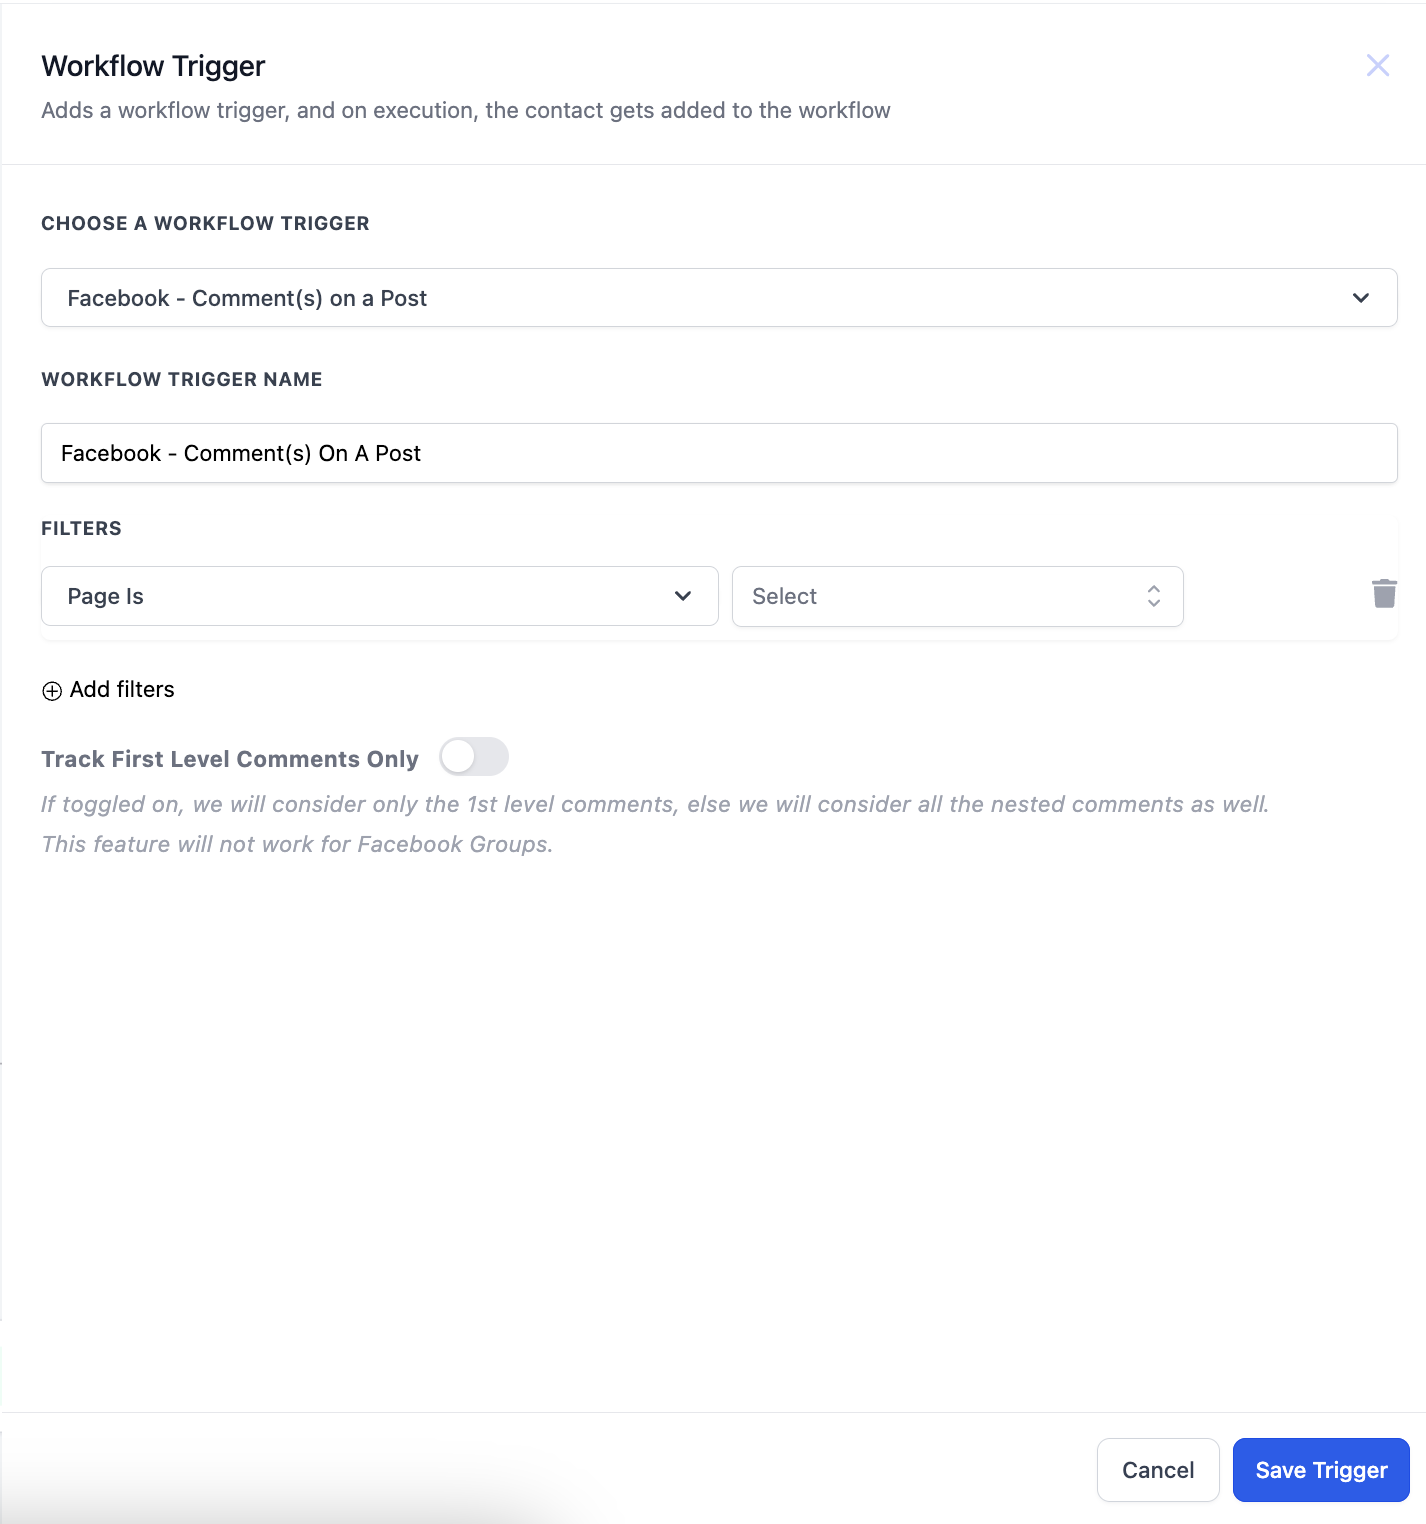

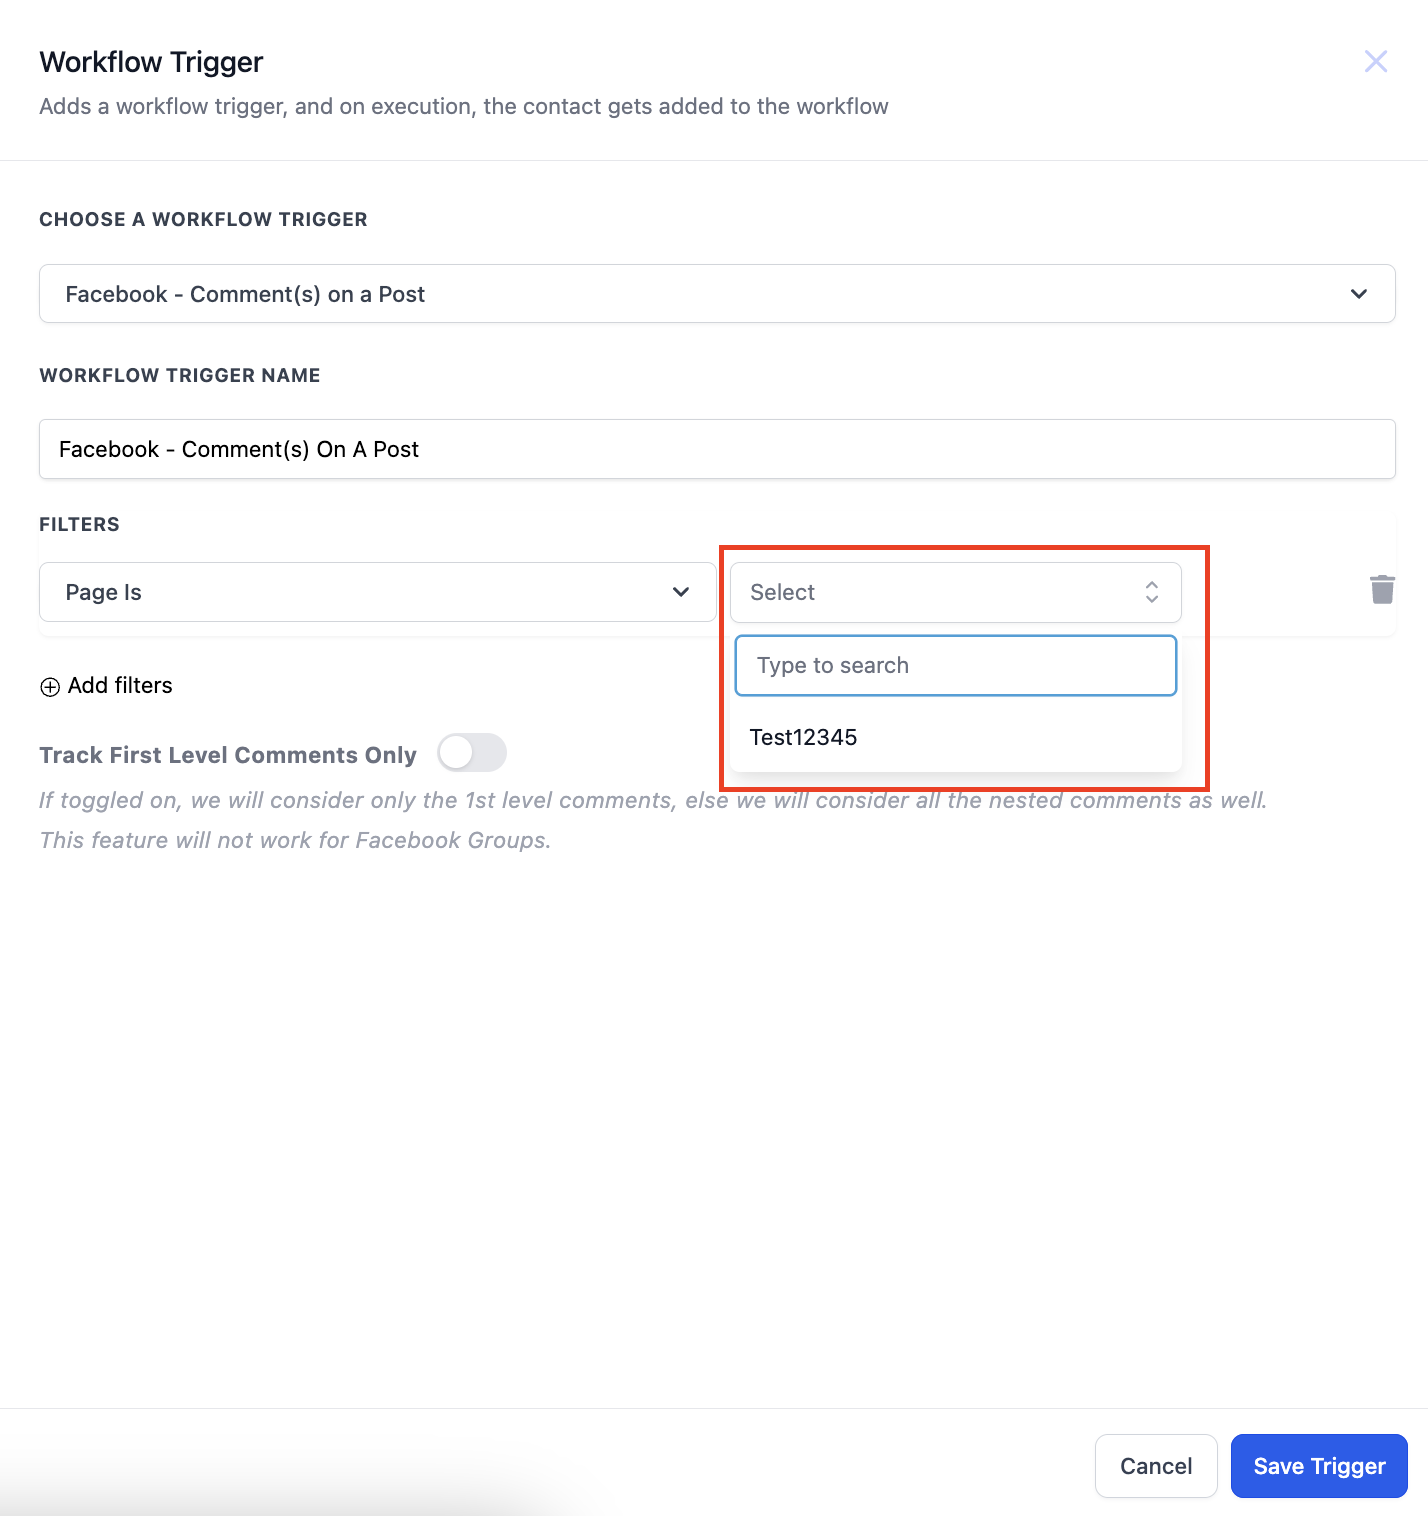
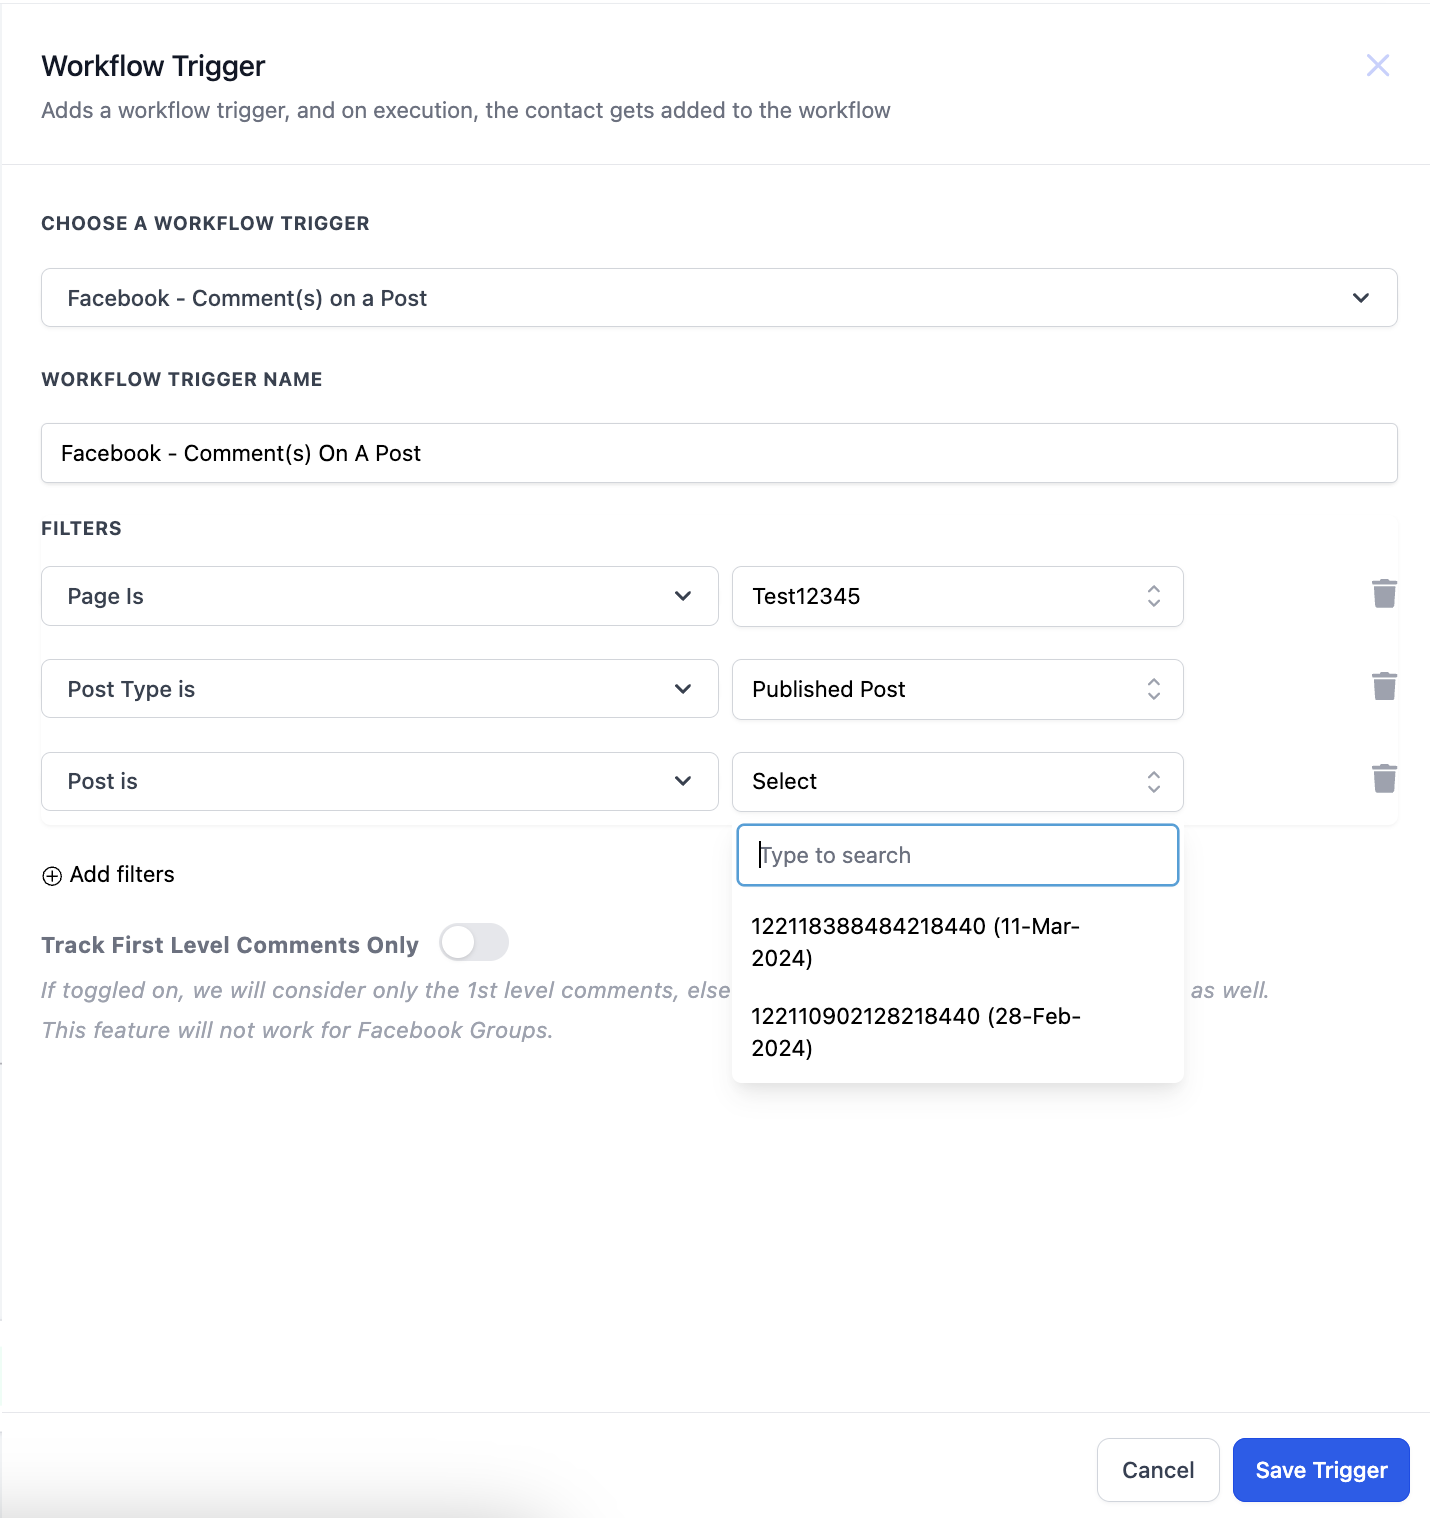
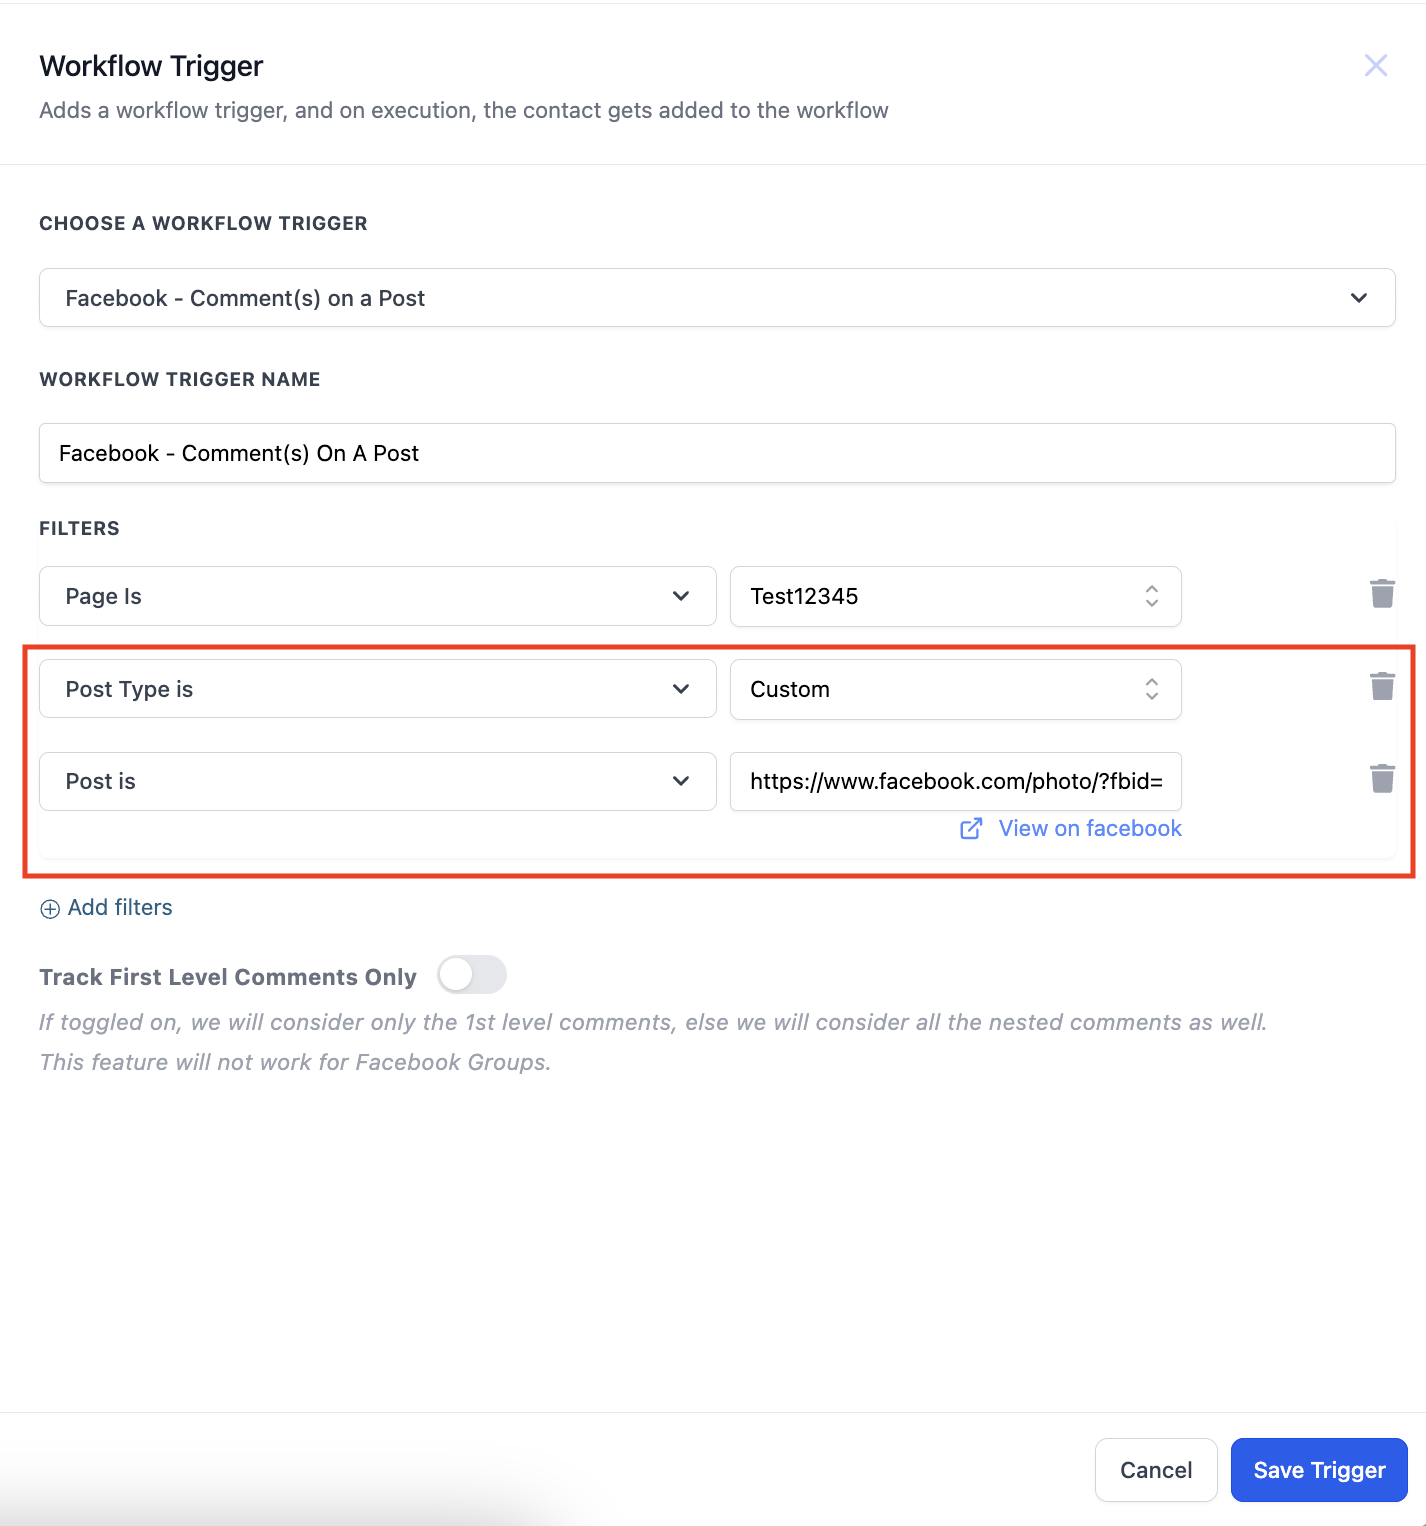
- After selecting the Page you have to select the Post Type. Post type can be “Published” or “Custom”
- Published Post – ‘Published Posts’ tab includes all posts on your business page – it could be text, photo, video or live video types of posts. You can also select the “View on Facebook” hyperlink to take you to the post.
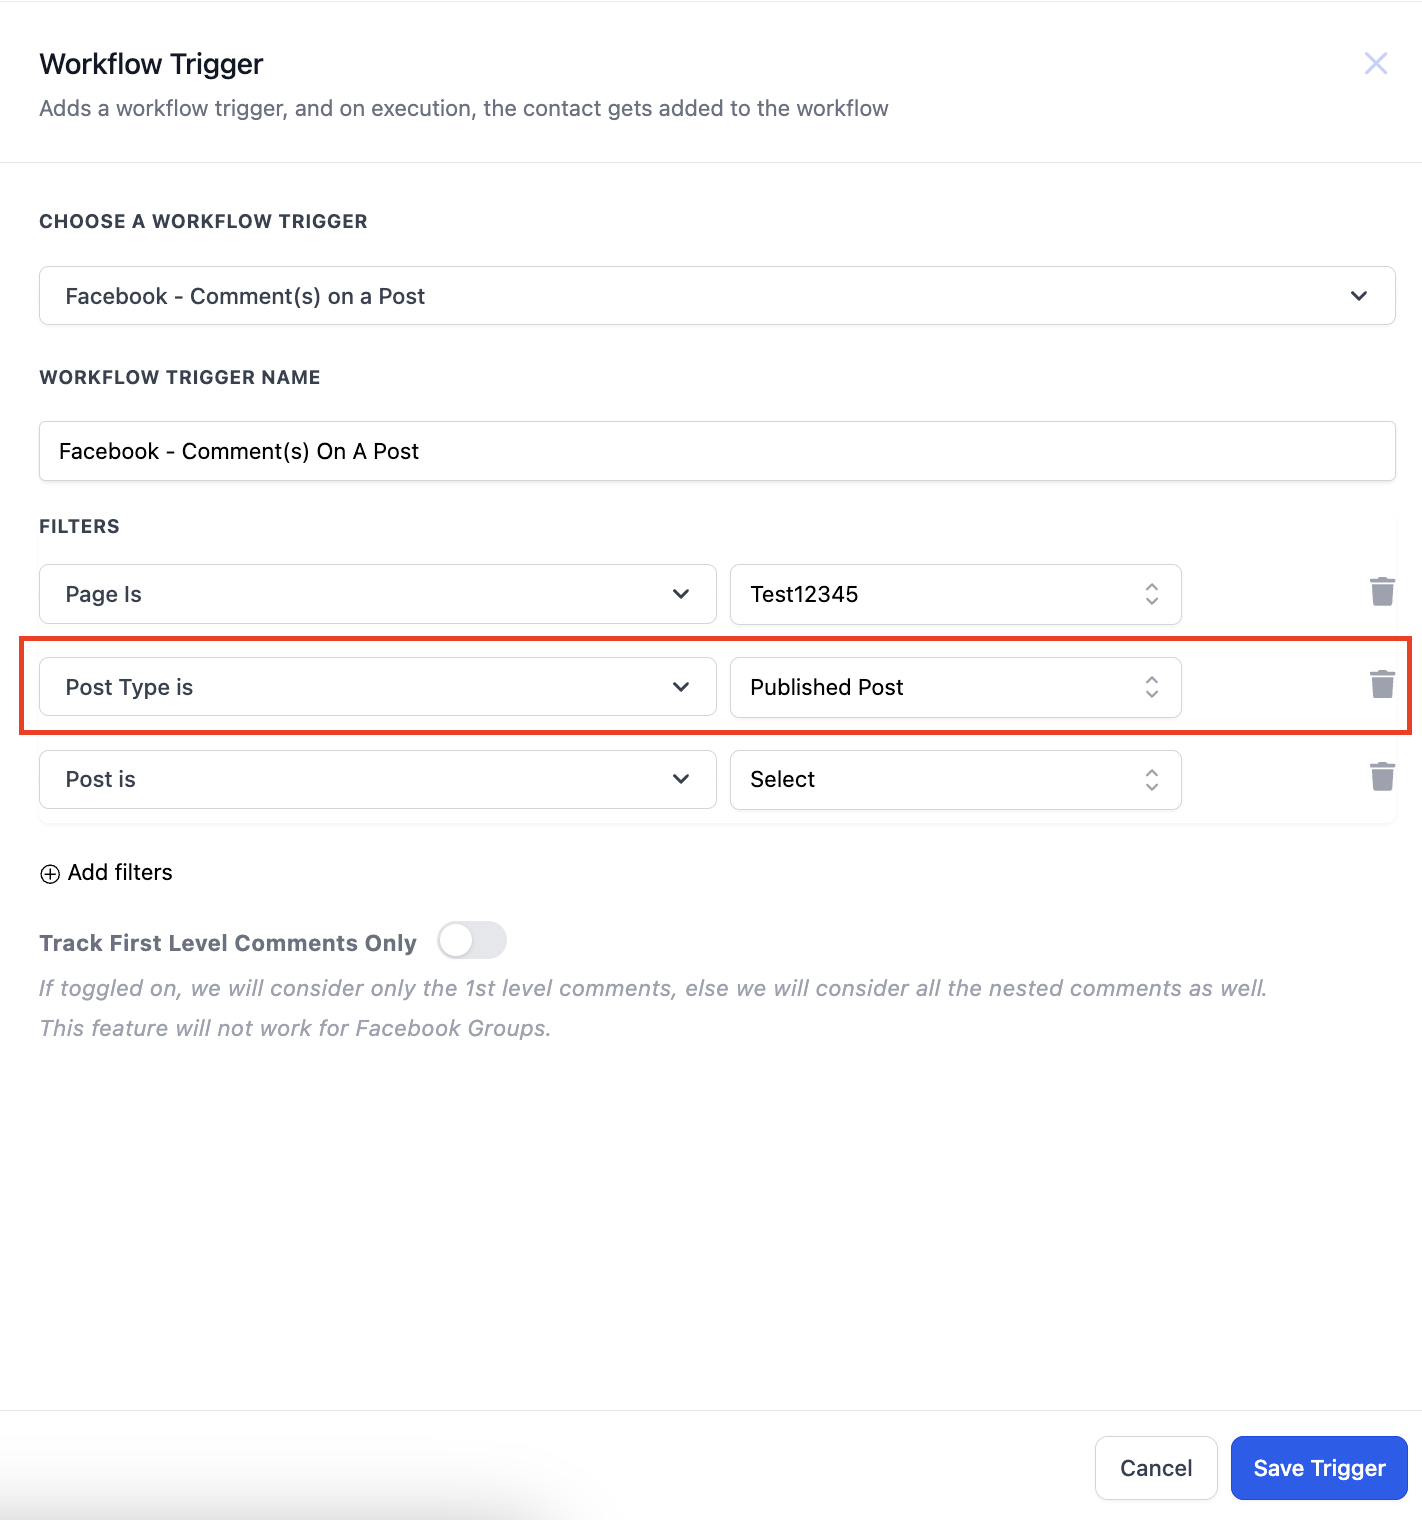

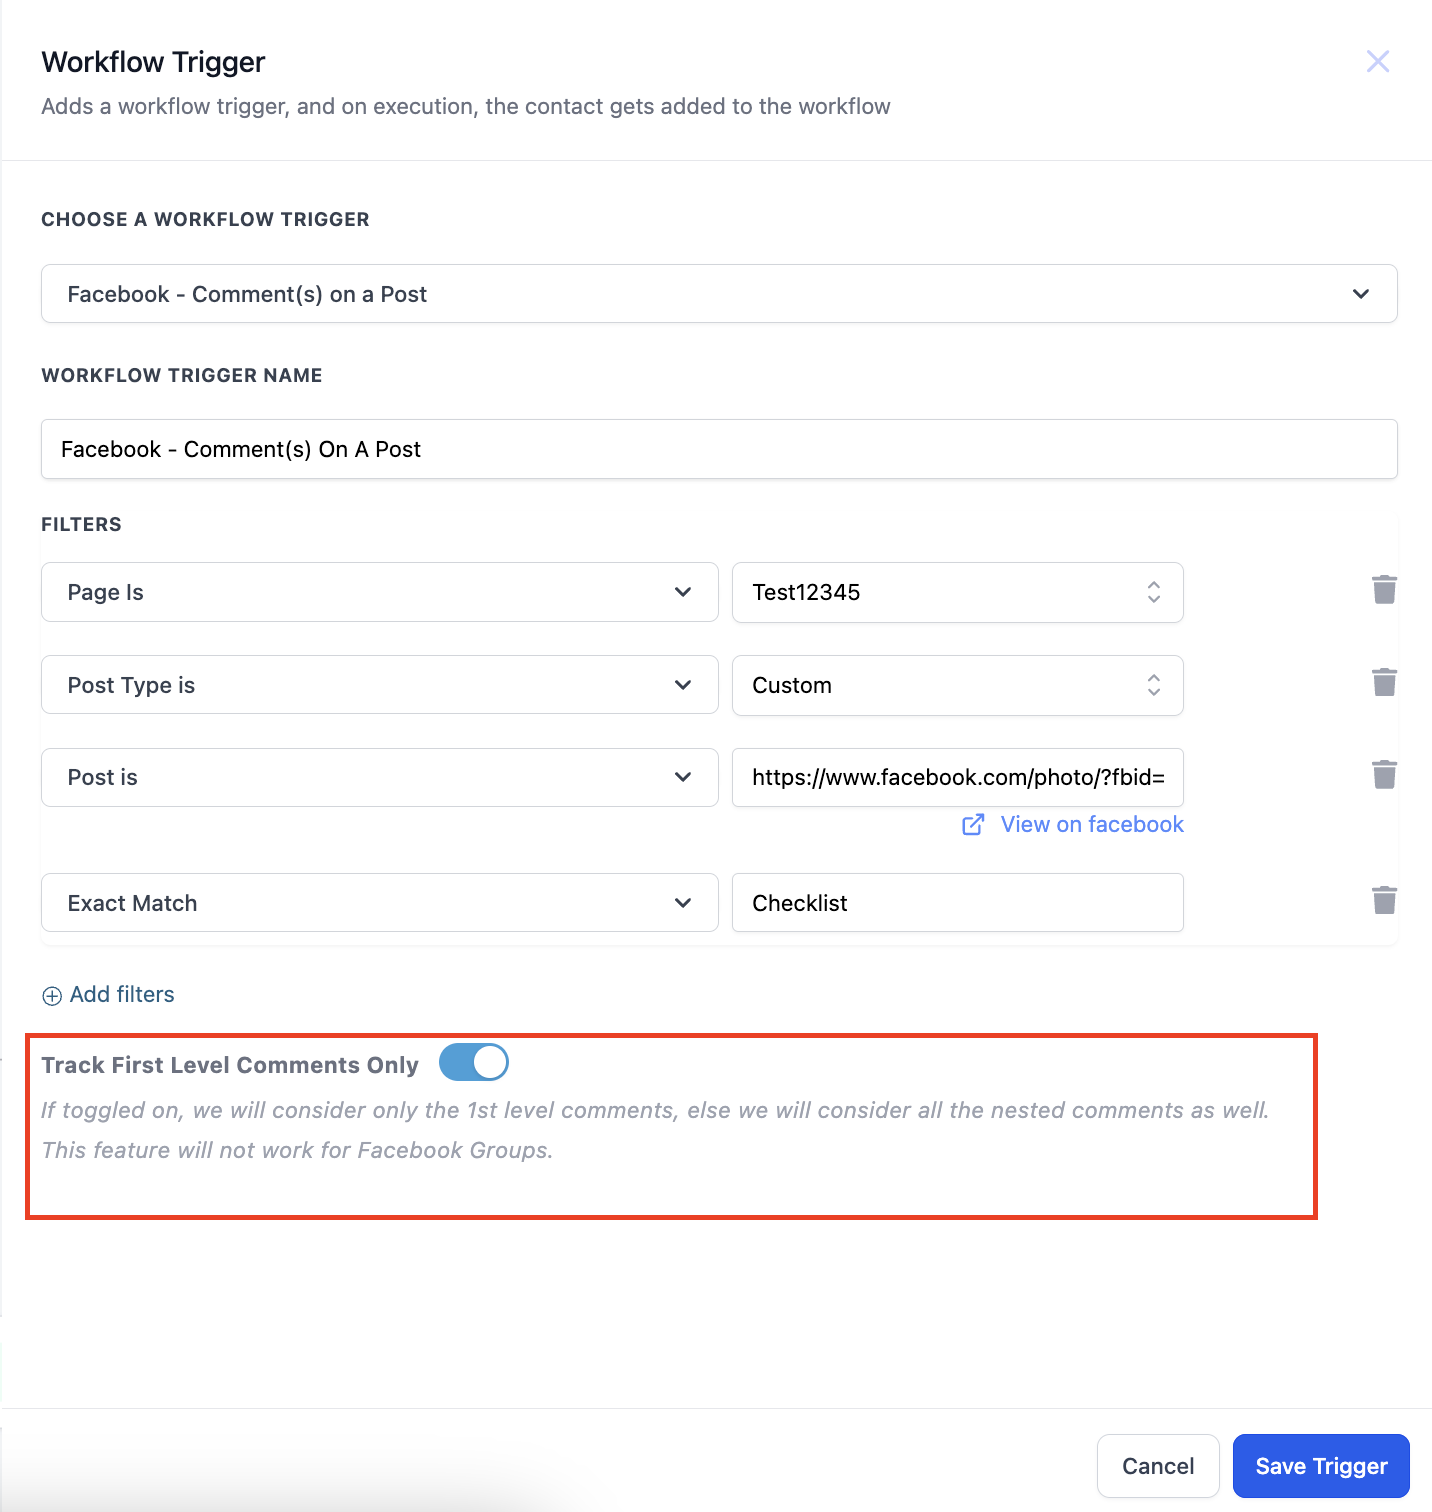
- Custom Post – ‘Custom’ tab allows you to find and connect the post by entering the Facebook post’s URL or ID. Select Custom in Post type, add the “Post is” filter and paste the URL of the post in the field against Post is field.
- After selecting the post you have to enter what are you looking for in the comment. You can select from 2 options “Contains Phrase” and “Exact Match”. Below are some examples to understand these 2 dropdown better.
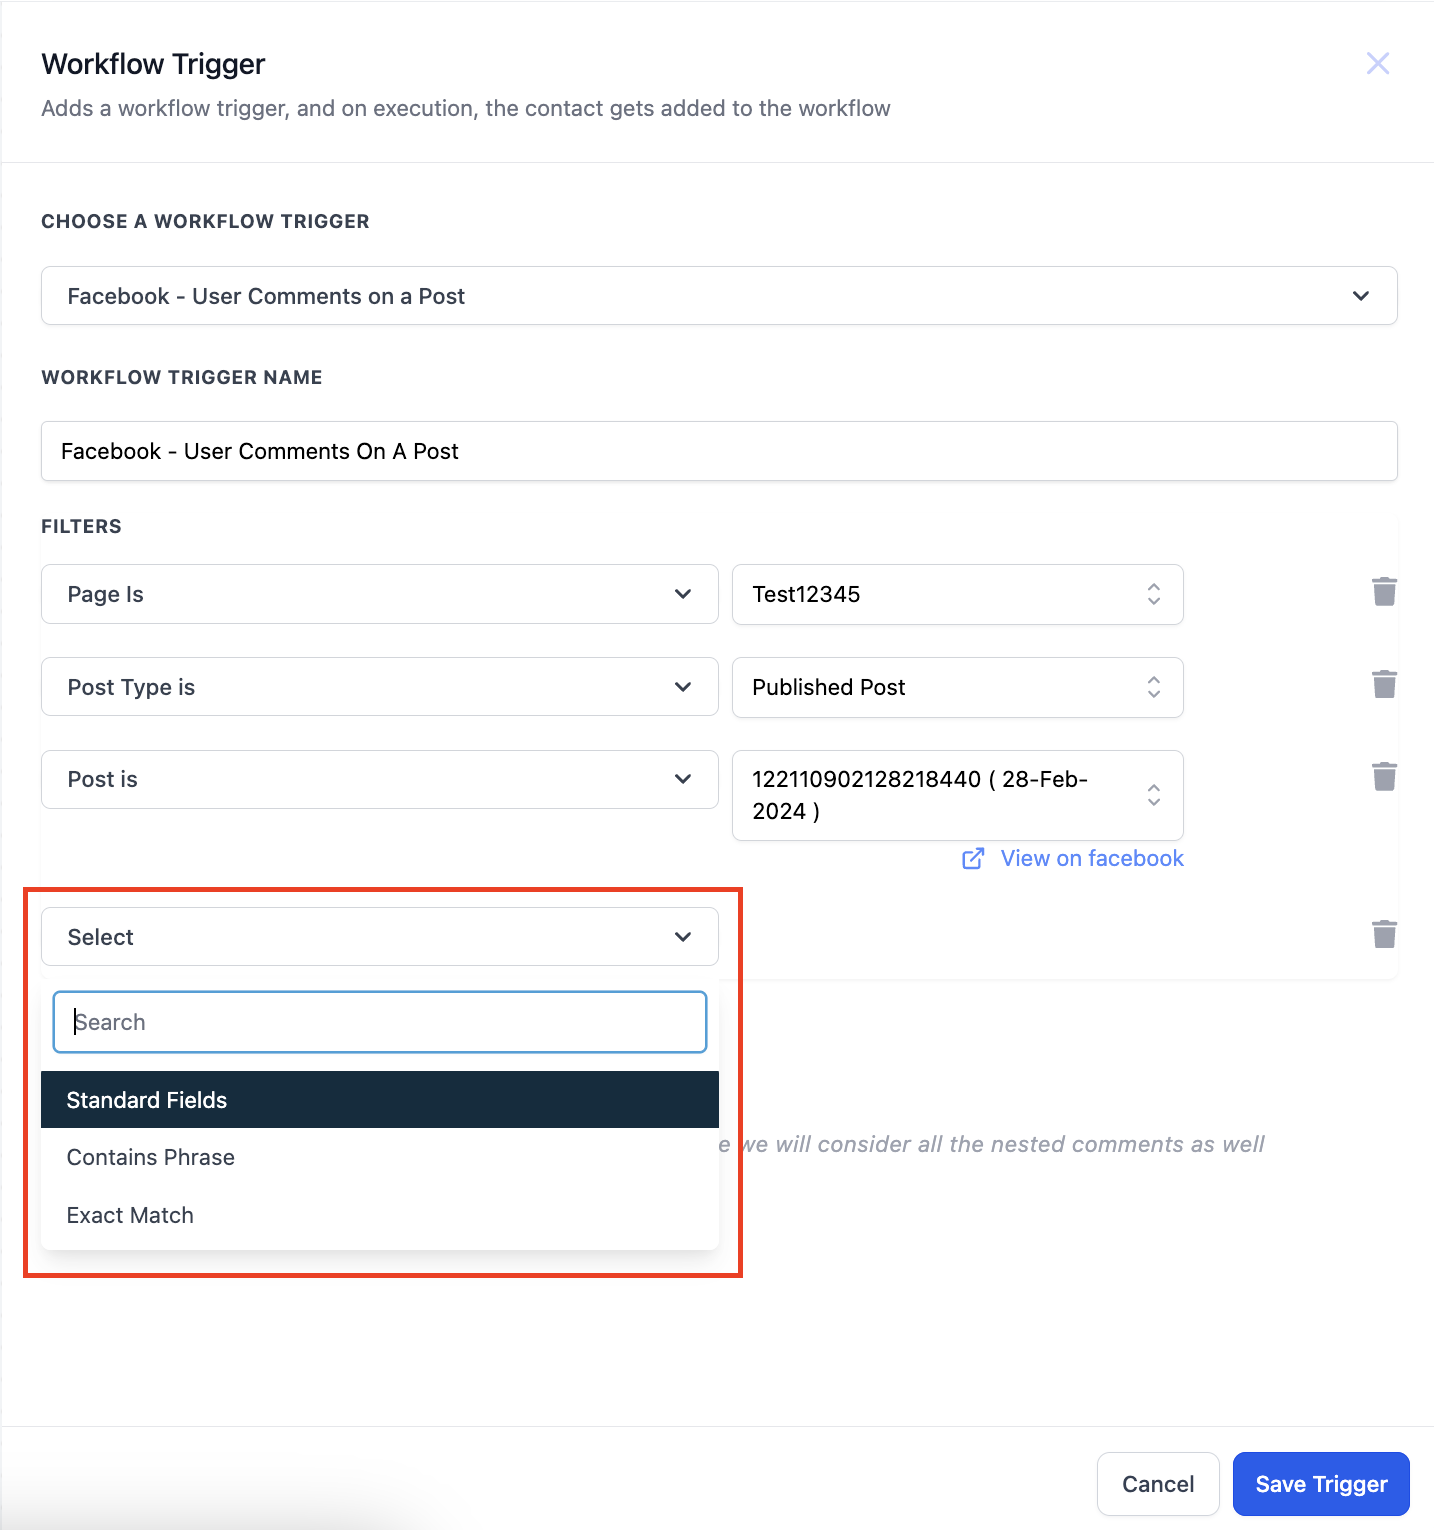
- You can also use the toggle to turn on tracking of only first level comments. If this is turned on only first level of comments will trigger the workflow.
When the contact will be saved?
When a contact is coming through the trigger, it will be saved as a contact and First Name and Last Name of the contact will be stored.
What are the new Actions?
There are 3 new actions in the “Communications” category.
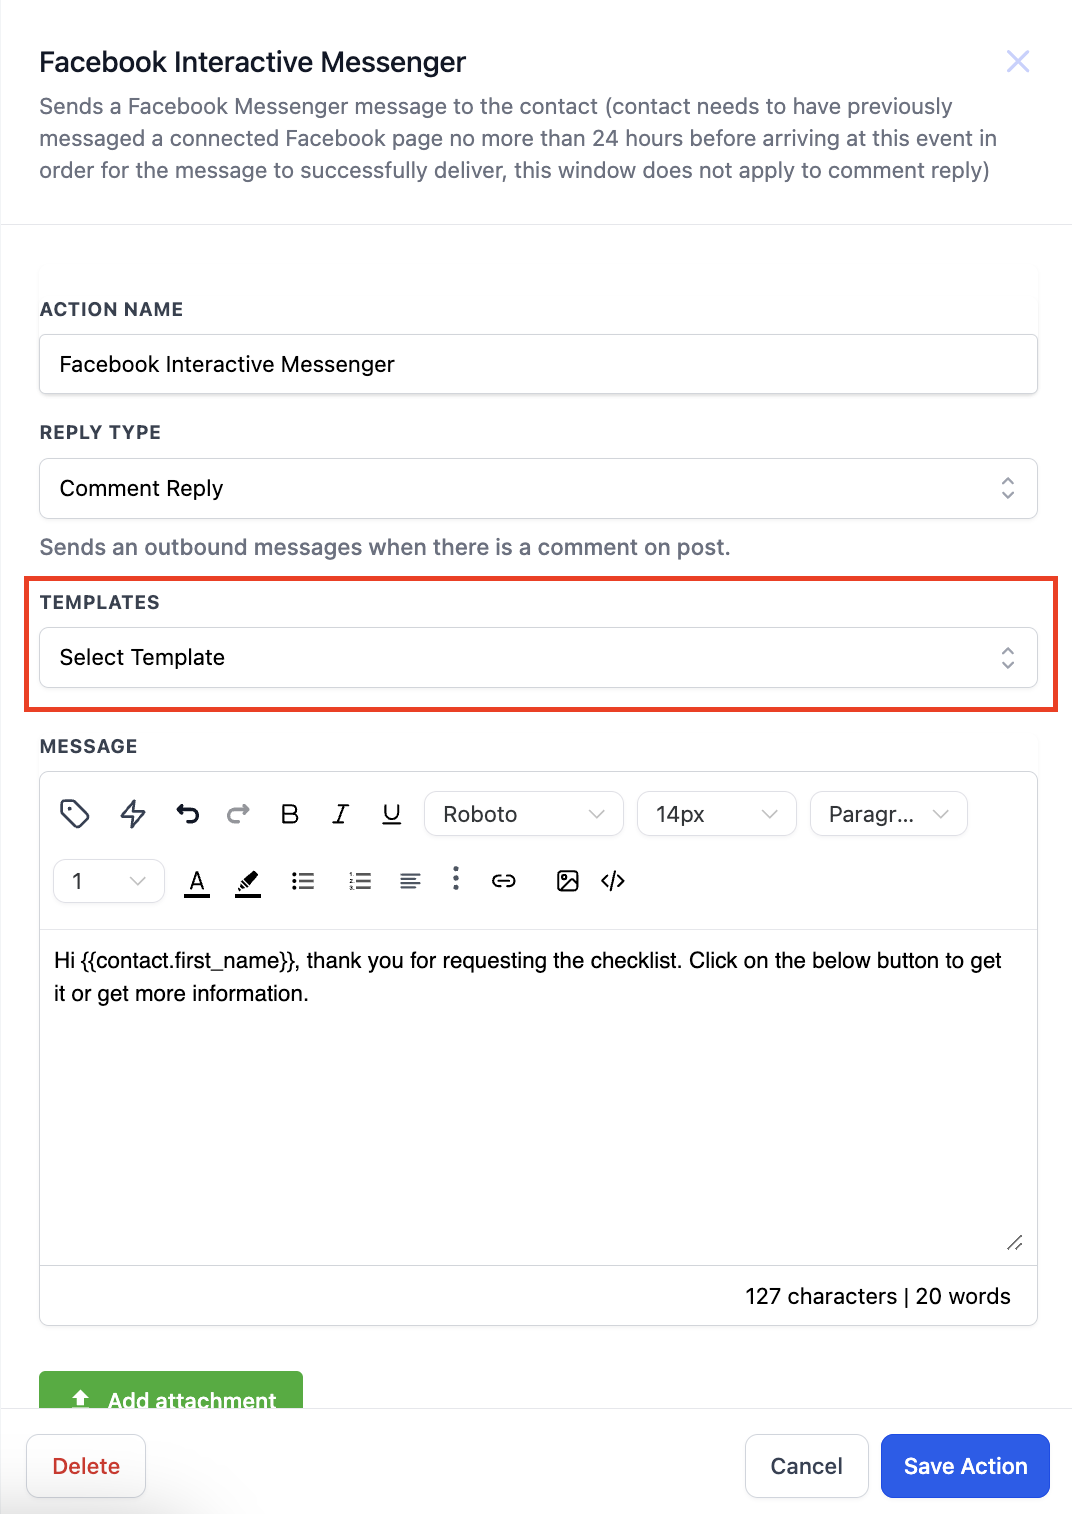
Facebook Interactive Messenger & Instagram Interactive Messenger
- On selecting any of the above mentioned actions the sidebar will open where you can capture all the relevant details.
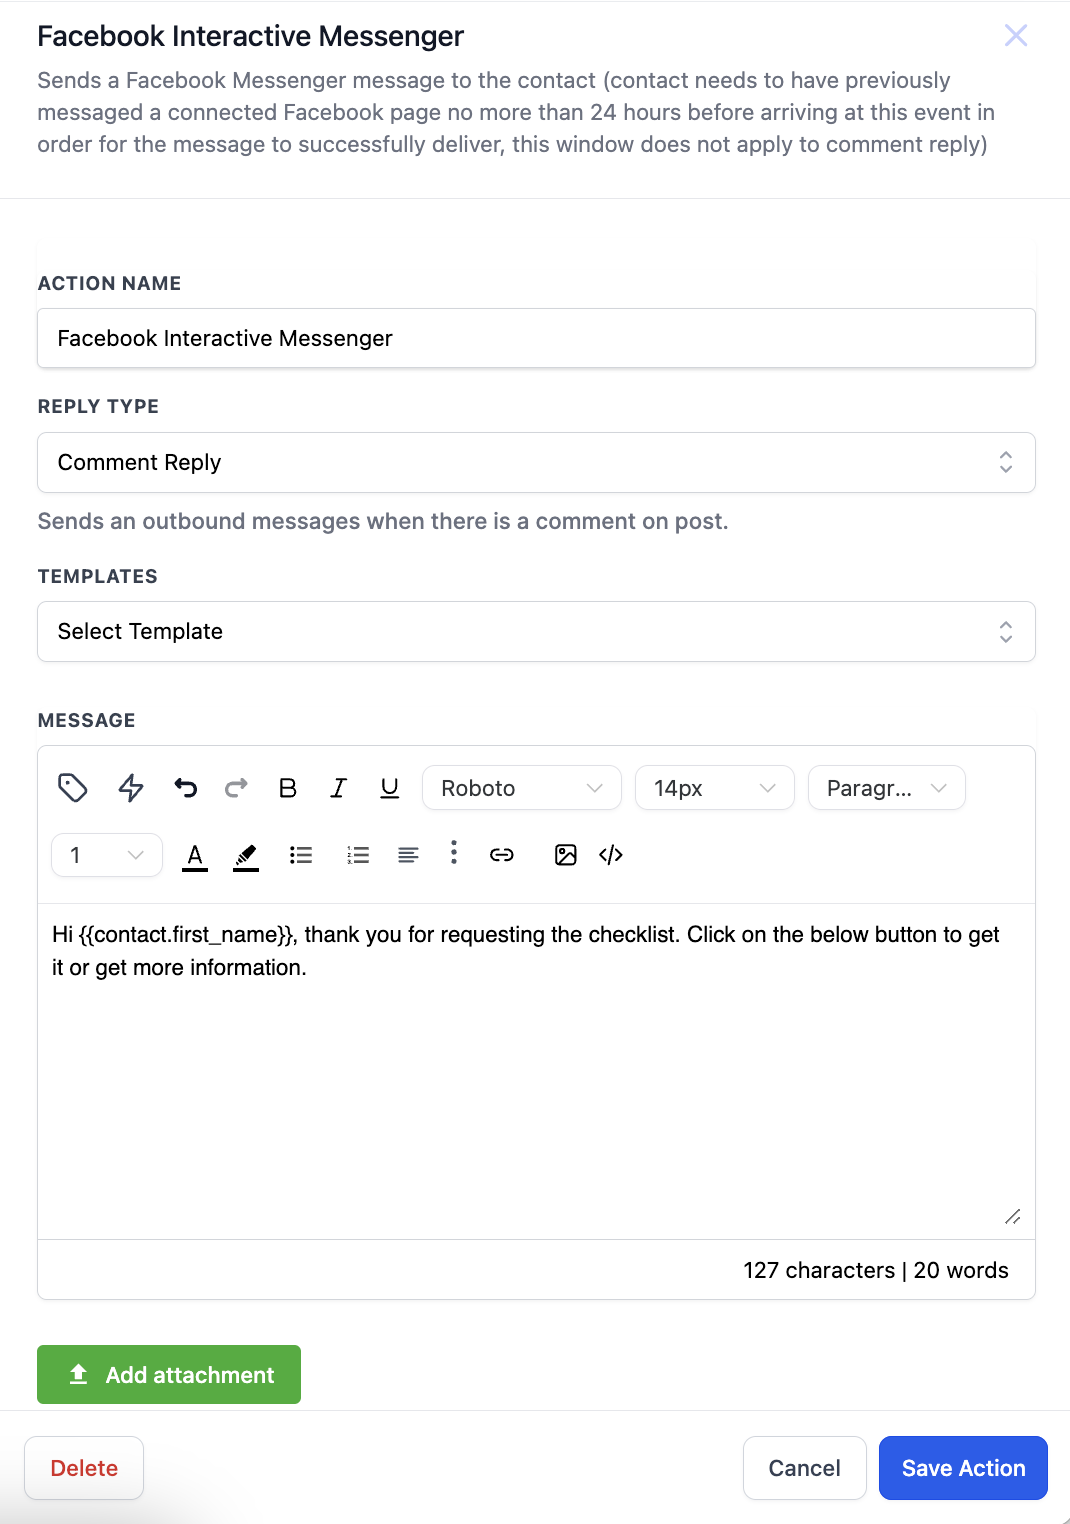
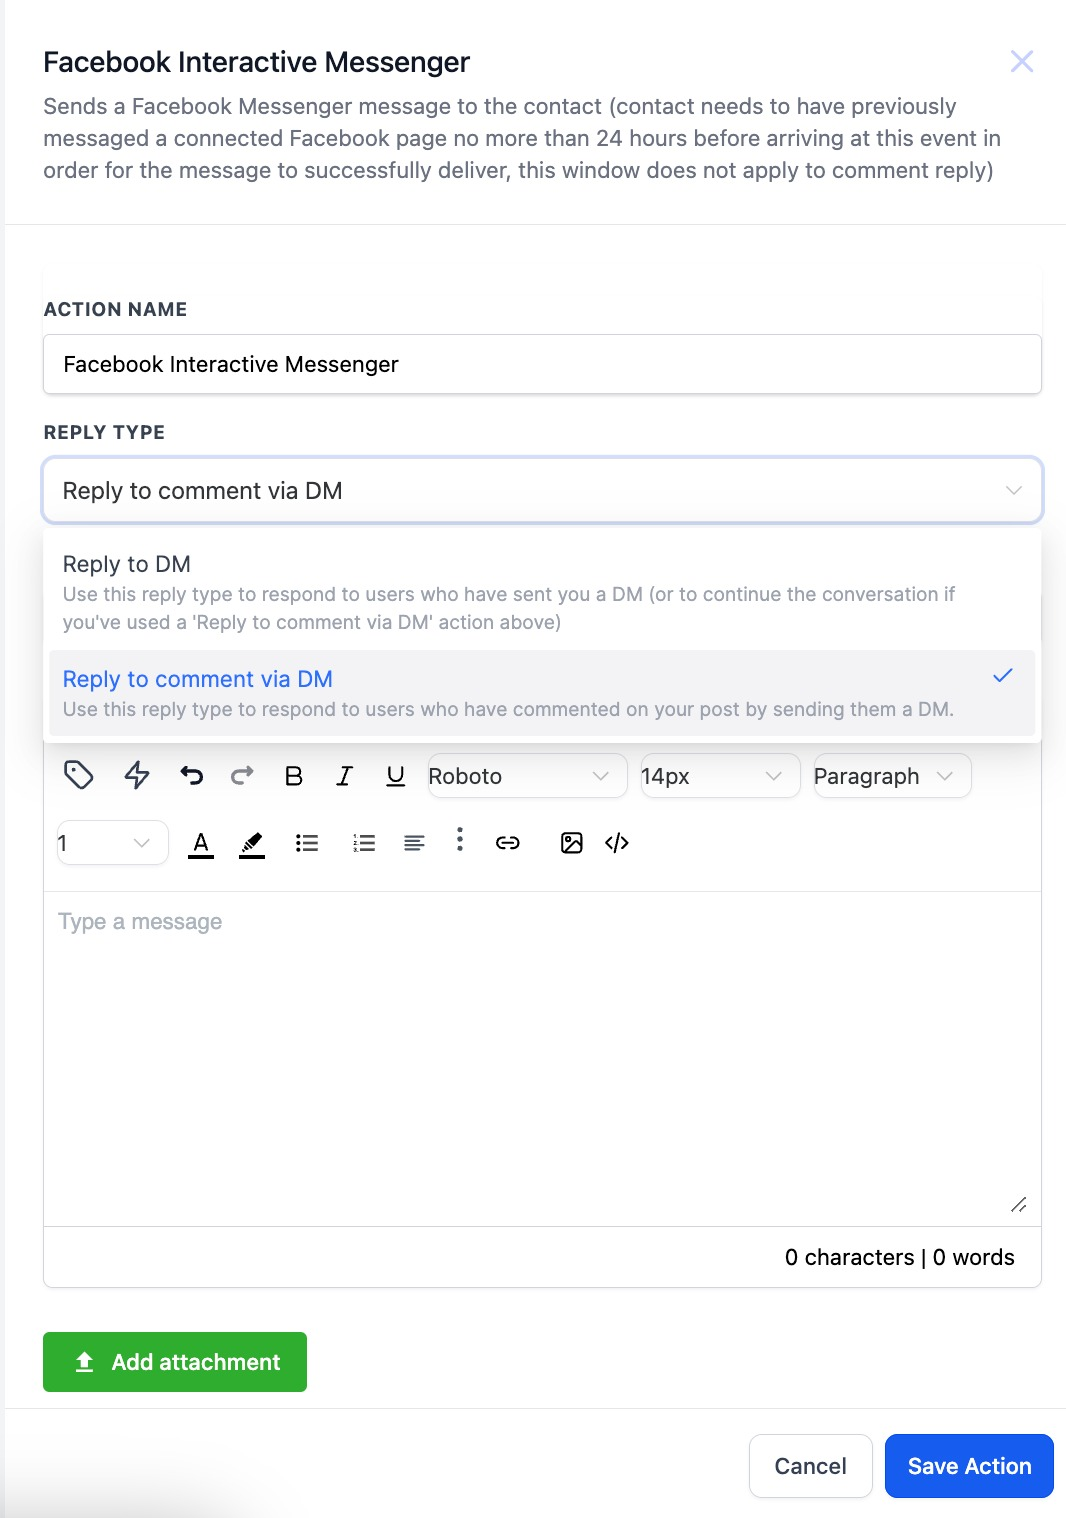
- First thing to do here is to select the “Reply Type”. You have 2 options to select from, Reply to DM and Reply to comment via DM
- Reply to DM – This is to be selected when you want to send an outbound message to the customer based on a direct message received from the customer.
- Reply to comment via DM – This is to be selected when you want to send an outbound message based on the comment made by the customer. If you want to use multiple actions in the same workflow remember that first action will be a “Reply to comment via DM” and subsequent actions will be “Reply to DM”.
- After selecting the reply type we have to configure the message that needs to be sent. You can select from pre existing templates or even right your own message.
- User also have the ability to attach files. Click on “Add attachment” and select an attachment from your drive or enter the URL to add the files.
- You can also add buttons with your messages. Now what are buttons, buttons are a great way to communicate with your customers and gives you the functionality to perform actions based on the button selection, share your number or share the website link.
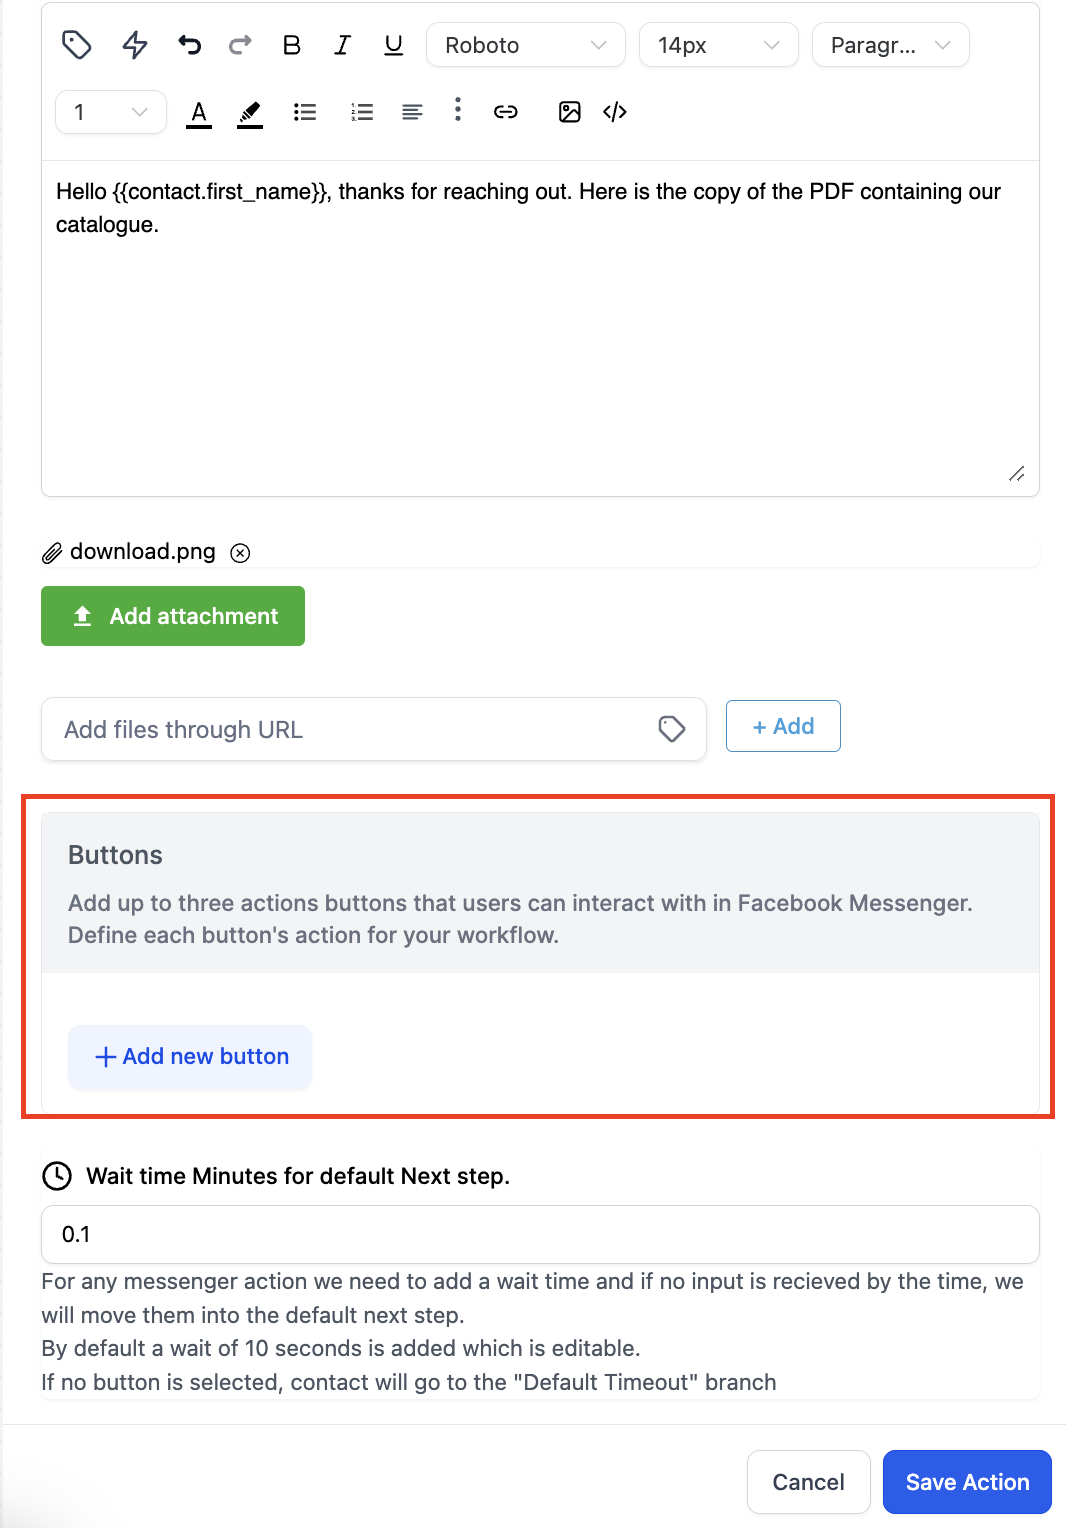
Click on “Add Button” to add the buttons, you can add upto 3 buttons.
- There are 3 types of buttons to select from –
a. Open website – Add a URL to this button. Enter the link here and user will go to that link when button is clicked.
b. Call Number – You can enter the number here and user can call on that using this button.
c. Perform Actions – This button can be used to further progress the conversation with the customer. You can add actions after this button to continue the flow.
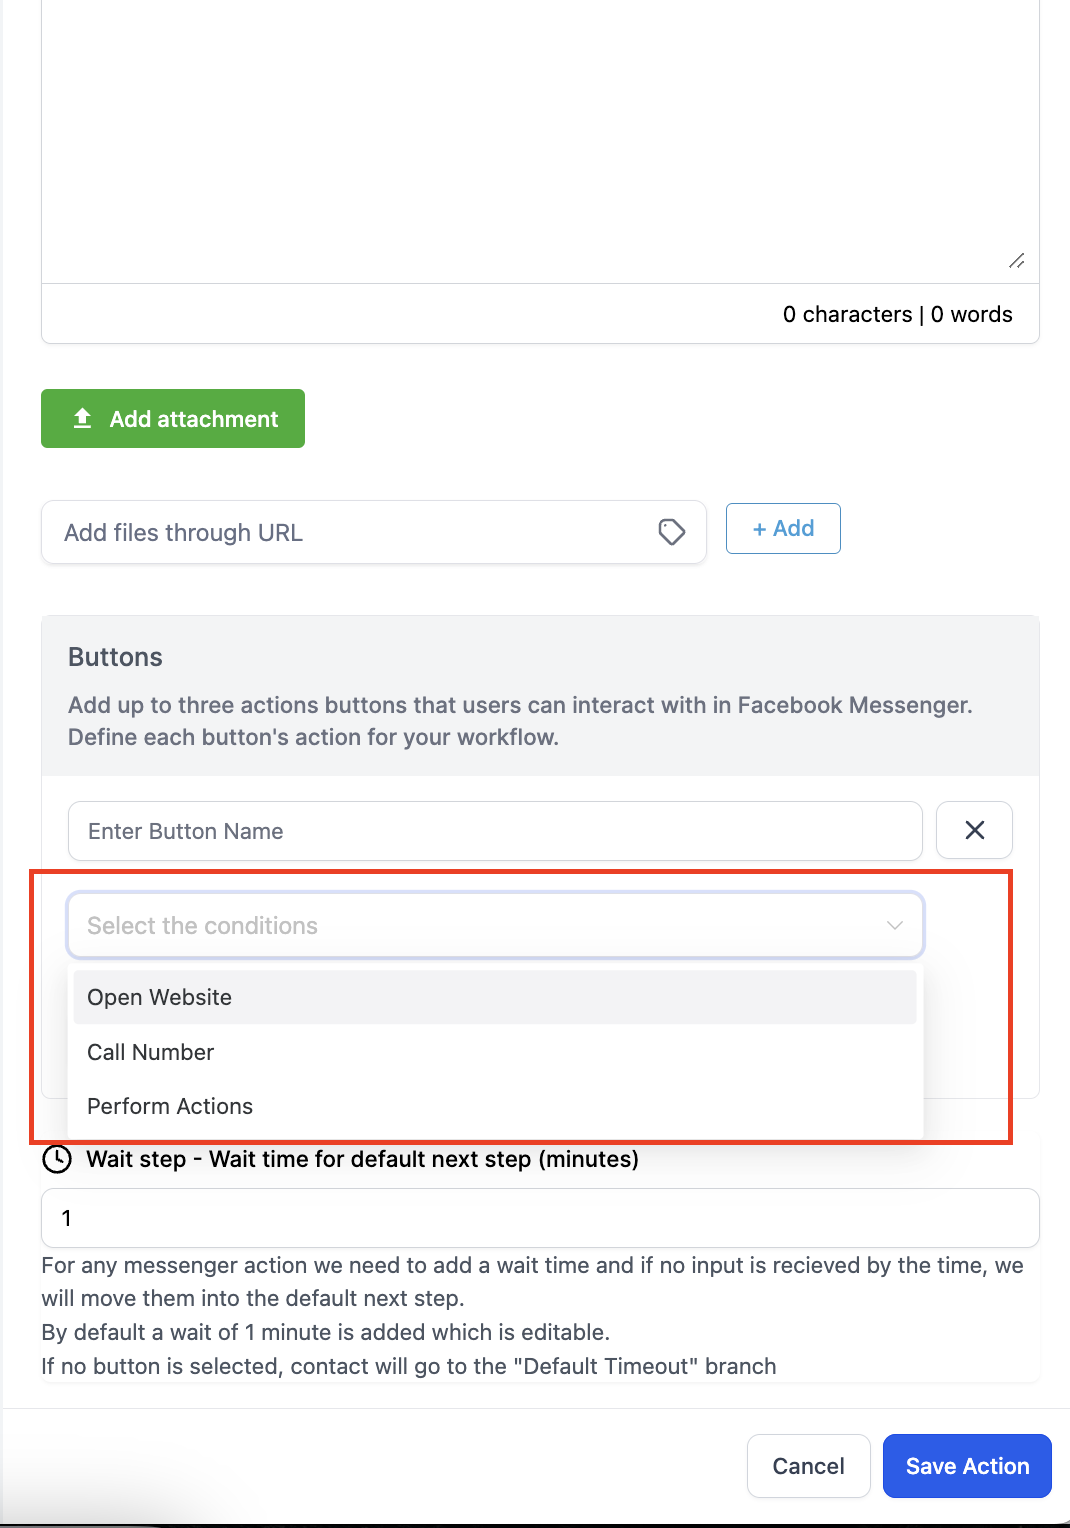
- The first thing to be added in a button is the Button Name. Next is the selection from the 3 button types and last is entering the phone number or URL for Call or Website button respectively.
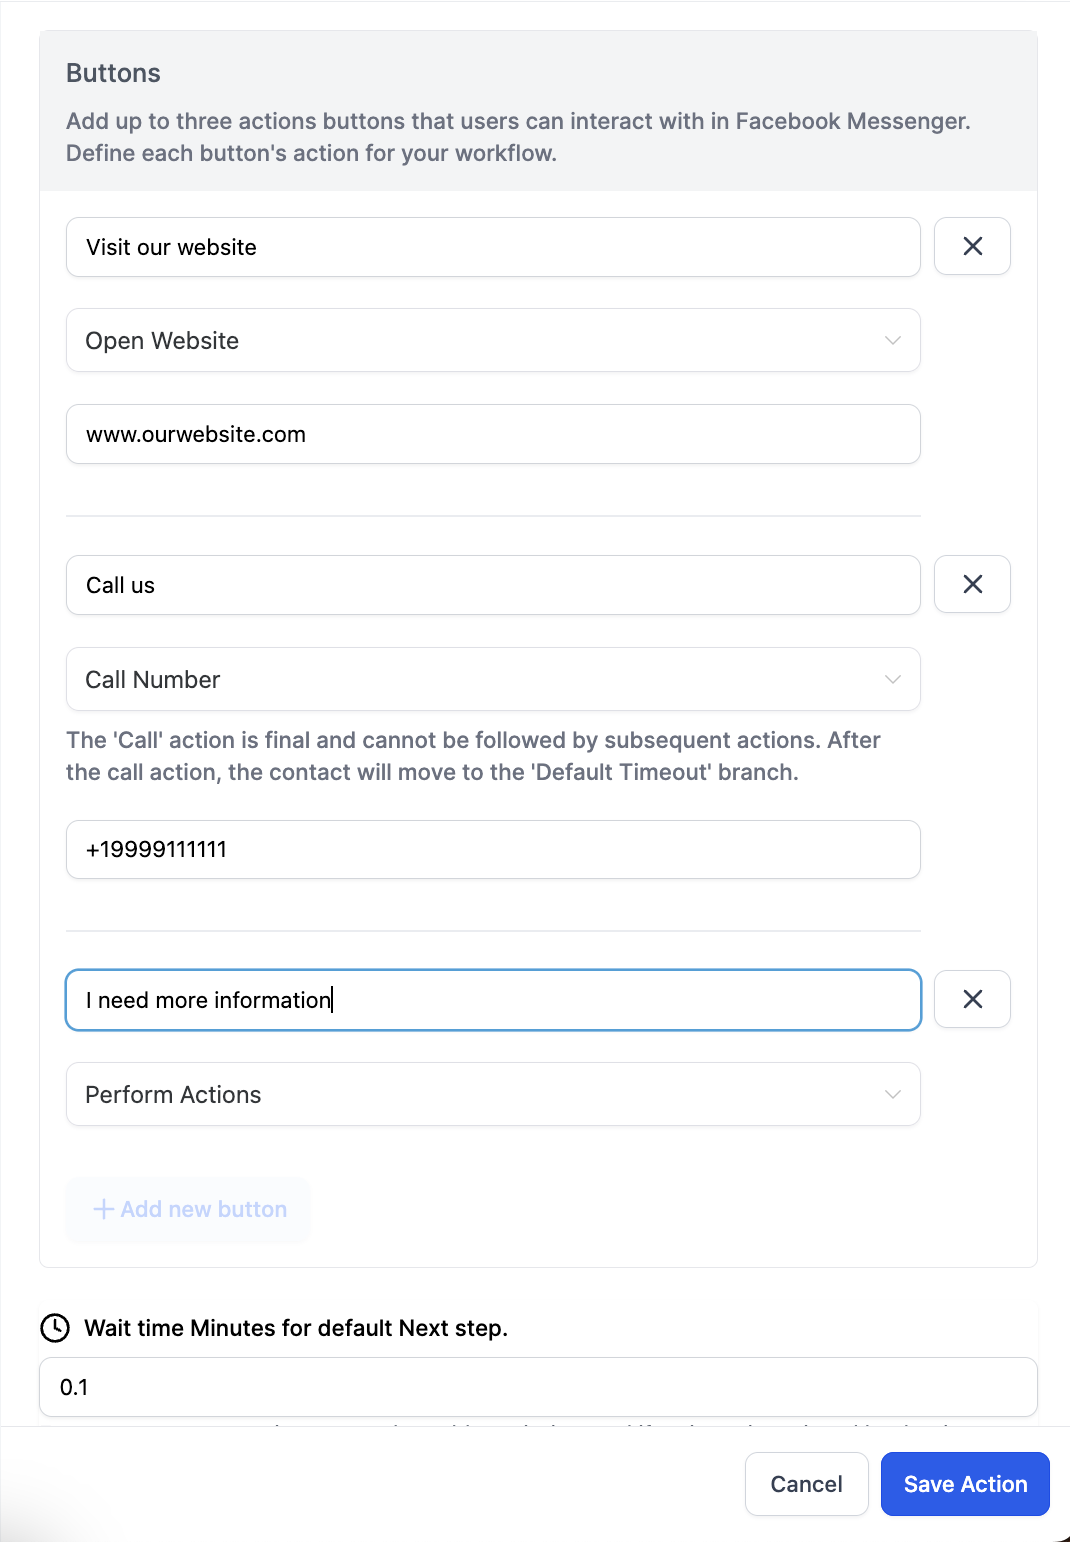
- Default Wait Time – This is a mandatory step. By default a wait time for 1 minute is added and it will be editable. After the given time has passed the contact will go to the “Default Branch”
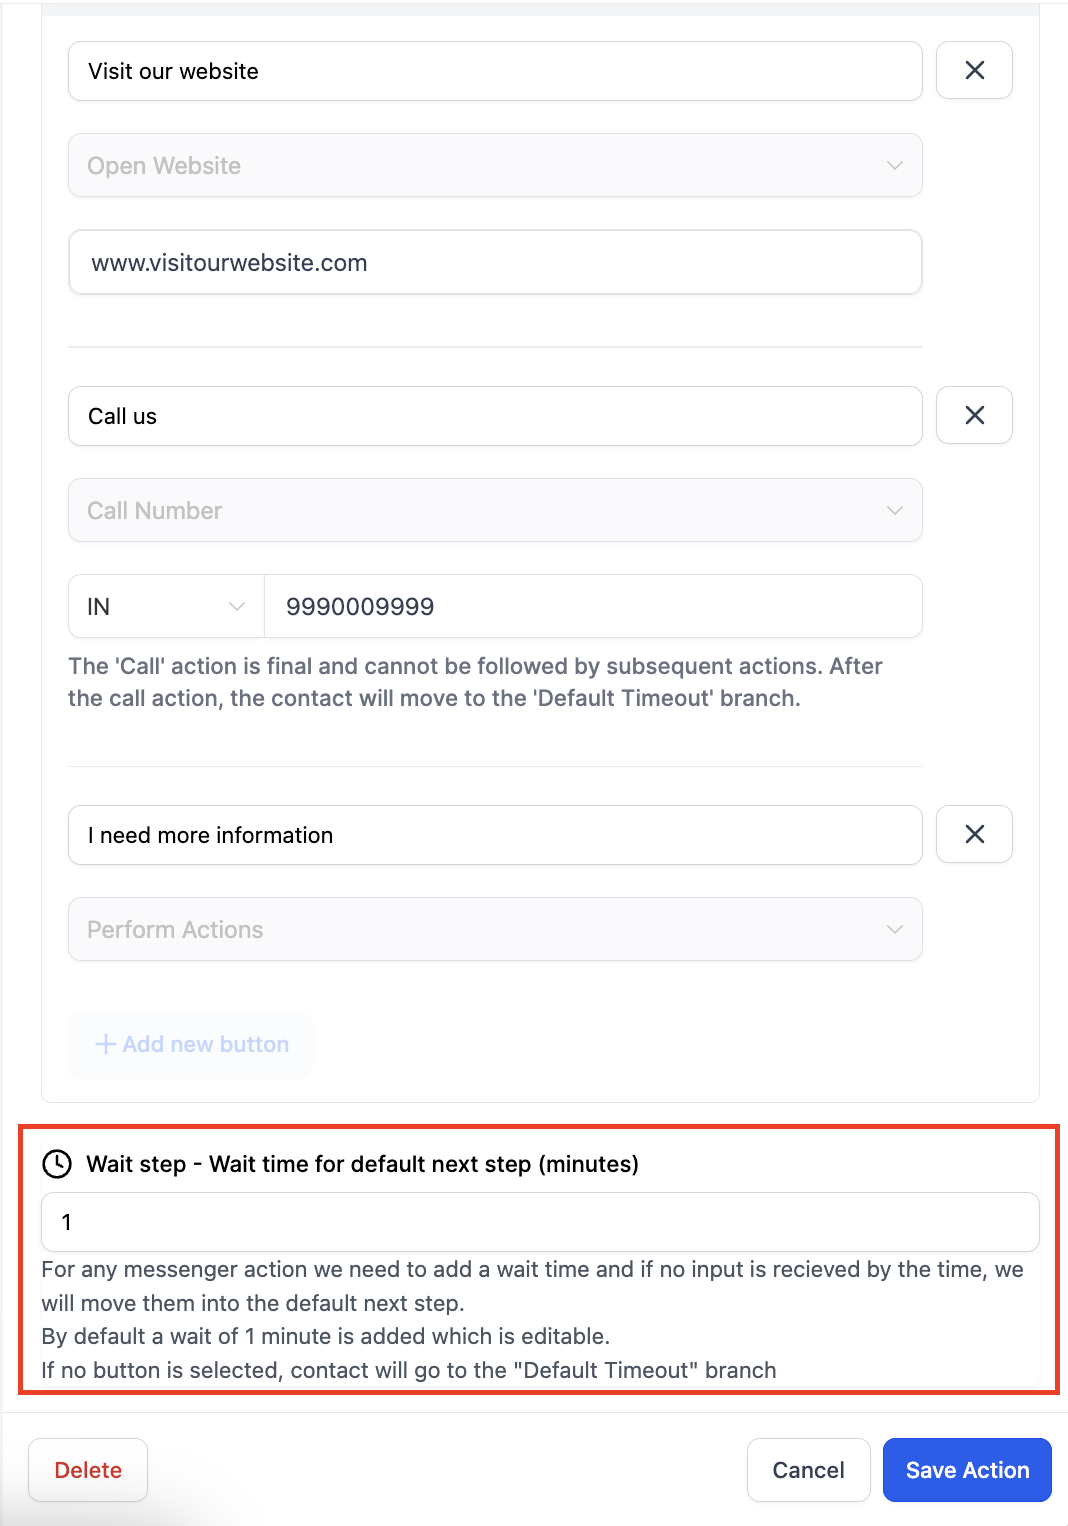
- Default Branch – A default branch will be available for the action all the time. If no reply is received from the customer or the “Call” action button is selected the contact will move to this branch.
Respond on comment action
- With the help of this action you can comment on the comment entered by the customer.
- You can add multiple replies and system will randomly select from these options and reply to comment.
- You also have a toggle button, switching the toggle button on will also like the comment.

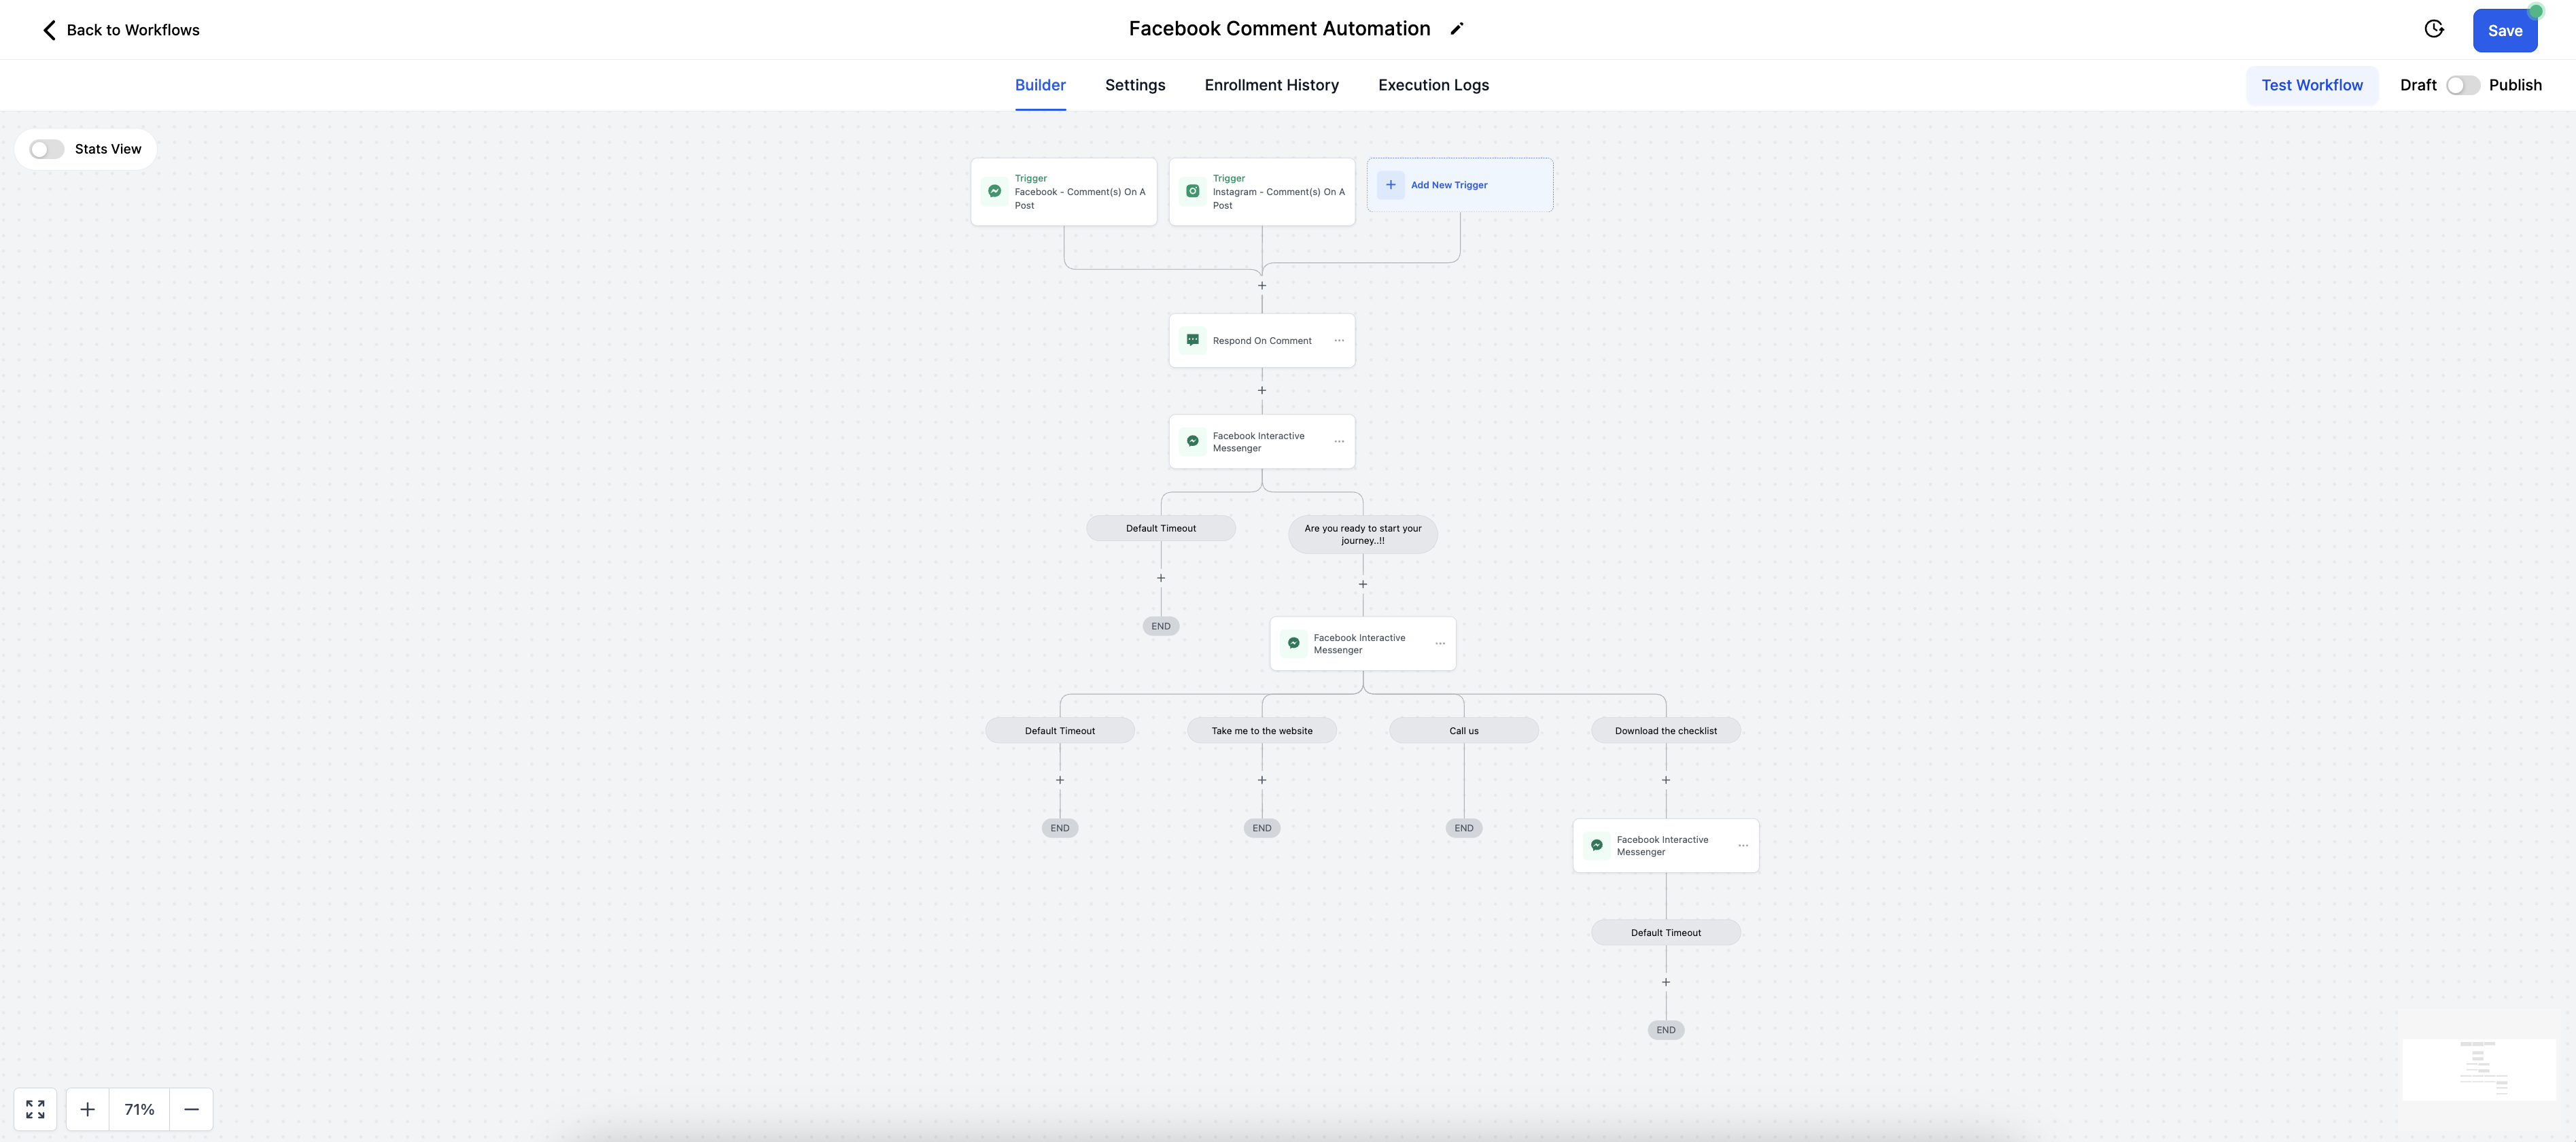
Here is how the workflow will look
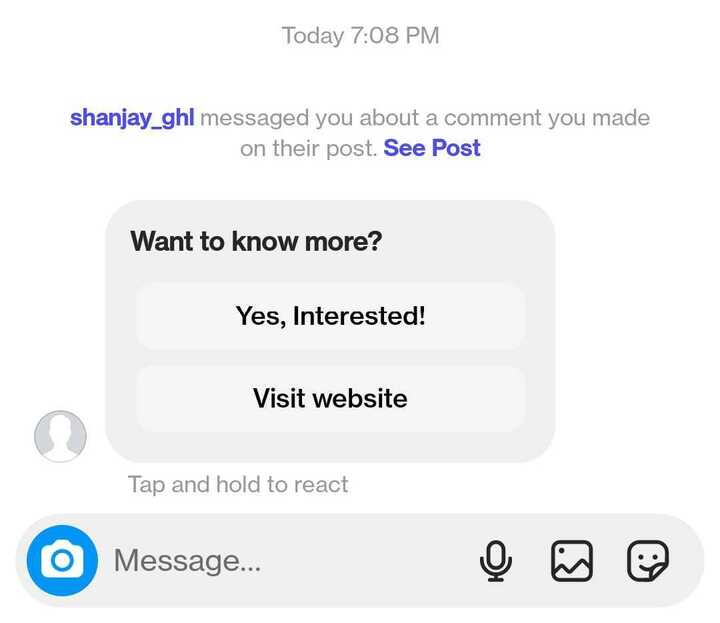
Here is how the message will look in Facebook and Instagram
Important points to be noted
- In triggers “Page is” is the first field to be selected. All the other fields are dependent on it and if the “Page is” filter is deleted all the other filters will also be deleted.
- Upto 3 buttons can be added in the Interactive Messenger action.
- No further actions can be added after the “Call” button.
- After the call button the contact will directly move to the Default Branch.
- By default a wait of 10 seconds is added which is editable.
- If no button is selected, contact will go to the “Default Timeout” branch.
- If Reply to DM is selected, the system will check if there is any conversation that happened within the last 24 hrs and if yes then it’ll send a message else it’ll fail to send.
- Reply to DM will be used in 2 scenarios. First one is when you want to start the conversation with the user who has send you a DM and second when you want to continue the conversation with the user after the Reply to comment via DM. For eg. when in the first action Reply to comment via DM is selected as Reply Type, subsequent actions will haveReply to DM as Reply type.
- When using Reply to comment via DM, if the contact has not replied to the First Interactive Messenger action then Interactive Messenger Action will not work in the Default Timeout Branch.
- For Reply to comment via DM a 7 day window is applicable. You need to send a reply to the comment via DM in 7 days otherwise the delivery will fail.
When You’re Ready, Here’s How We Can Help:
Free Planner
Goals are important. If you want help reverse engineering your vision into bite-size goals and tasks — download The Power Planner for free.
Download Now

Free Challenge
Learn faster, train your creative muscle, and craft genius level ideas for your content, business, and life direction.
Join The Challenge
The 2 Hour Writer
Implement Our 2 Hour Content Ecosystem To Learn High Impact Digital Writing, Boost Your Online Authority, & Systemize Content Creation For Rapid Growth
Enroll in 2HW
Get started with WP-Propulsion
See how WP-Propulsion can help you with your needs.